Hey there, developers 🖖 Welcome to the first post of the year, and also the first post after the redesign of our website! I wish you all the best for the new year, and I hope you have a great time with it ✨
Before we continue our journey learning about design systems and the scenarios it can help you with, I want to share with you a little bit about the a library that I have been exploring more in the last couple of months. It’s called React Query.
Even though I believe most of you probably already know about it or have heard about it, I reckon this post can provide us with a joyful experience if we take the time to learn about it, or learn more about it, or even just refresh our knowledge about it. I’m sure you’ll find it useful in your next projects!
Before we jump into a practical introduction to React Query, grab your favorite reading beverage ☕ and let’s get started, developers 👊
Table of contents
Open Table of contents
Introduction
Well, we know from our past experience that managing cache in a web application can easily be a challenge. If you haven’t done it yet, believe me my friend…it surely is!
However, the good news is, we’re not alone. There are libraries out there that can help us with this, developers! And that’s exactly what we’re going to explore in this post, to be more specific, we’re going to explore how to use React Query to manage cache in our React applications.
I’ve got to say, the React Query documentation is a great way to learn about the library because for obvious reasons, they cover all the different commands, use cases, and scenarios that you can use it for (highly recommend!). Although my goal today is to show you a practical approach, so I’m going to focus on the most important use cases, and the most important commands (from my humble experience 😅).
Sweet, we need a few (quite brief) inputs first so we can understand where we are heading to:
-
What is React Query?
In simple words, it’s a library that helps us manage cache in our React applications. -
What does it solve?
It handles how, when, and how often the data is loaded and updated. Most of it comes out of the box, but if you need, it provides lots of flexible options to customize. -
How does it work?
An unique key is used to identify the data in the cache, and the data is loaded and updated based on the key. There are different configurations for when to load data, update data, how often to update data, and more.
You might be thinking by now: ” I’m sold, now how can I use it?”. Well, stick with me developer ‘cause I’ve prepared a nice learning experience for you, and I hope you’ll enjoy it 💪
Caching
PS: For those of you who already have a solid understanding of caching, feel free to skip to the next section (Create React App).
Developers, to be honest with you, there’s no step beyond this point if we don’t have a good understanding of how caching works! Let’s start with the basics:
Once I have heard: “Do not use libraries to fix problems that you don’t yet have.”. It kind of makes sense, doesn’t it? Well, I could try to come up with some fancy definition or try to explain it with my own words, it would not be better than a good ol’ MDN definition:
“The performance of web sites and applications can be significantly improved by reusing previously fetched resources. Web caches reduce latency and network traffic and thus lessen the time needed to display resource representations. HTTP caching makes Web sites more responsive.”
Or even this one from AWS:
“In computing, a cache is a high-speed data storage layer which stores a subset of data, typically transient in nature, so that future requests for that data are served up faster than is possible by accessing the data’s primary storage location. Caching allows you to efficiently reuse previously retrieved or computed data.”
I guess you got the point, right? Depending on how frequently you need to access your data, you surely want to cache it. Therefore, next time you need to use the same data, you can just load it from the cache instead of hitting the server.
“To be honest, I don’t understand how this thing called “caching” could be complicated as people say.”. I don’t blame you, I thought it too at a certain point 😎 If I may, let me tell when it starts to get really complex:
- The cache must be updated in the background, so the app is fully responsive and presents up-to-date data;
- The cache must be invalidated when the data changes, so when fetching the API, the cache is updated;
- Depending on the structure of the data stored in the cache, if your app gets a new version released, you must decide whether to invalidate the cache or not;
- The cache must be easily and quickly accessed so that the app is fast and responsive;
- When the user leaves the app, the cache must be cleared following a certain policy, so that the app is not using stale data;
- And the list goes on and on…
For our luck, companies and open-source communities have been developing libraries and features to help us with this, such as client-side storages (cookies, web storage, local storage, session storage, indexedDB, etc.) and React Query.
Enough talking, let’s get to work, developers 👍
Create React App
My friends, to save some time and effort, shall we take a shortcut and use an app that I have previously created for us? It’s a pretty basic one, and only contains the components that we need to learn about React Query.
You only have to clone the repository to your local workspace, pull the latest version from the template branch, and you’re good to go ✌️
git clone -b template https://github.com/danilocastronz/weldev-post-cache-react-query.git

cd weldev-post-cache-react-query
yarn install
Next, to make ensure that the app is working, let’s run the app:
yarn devYou should be able to see the app running on your browser, and looking like this:
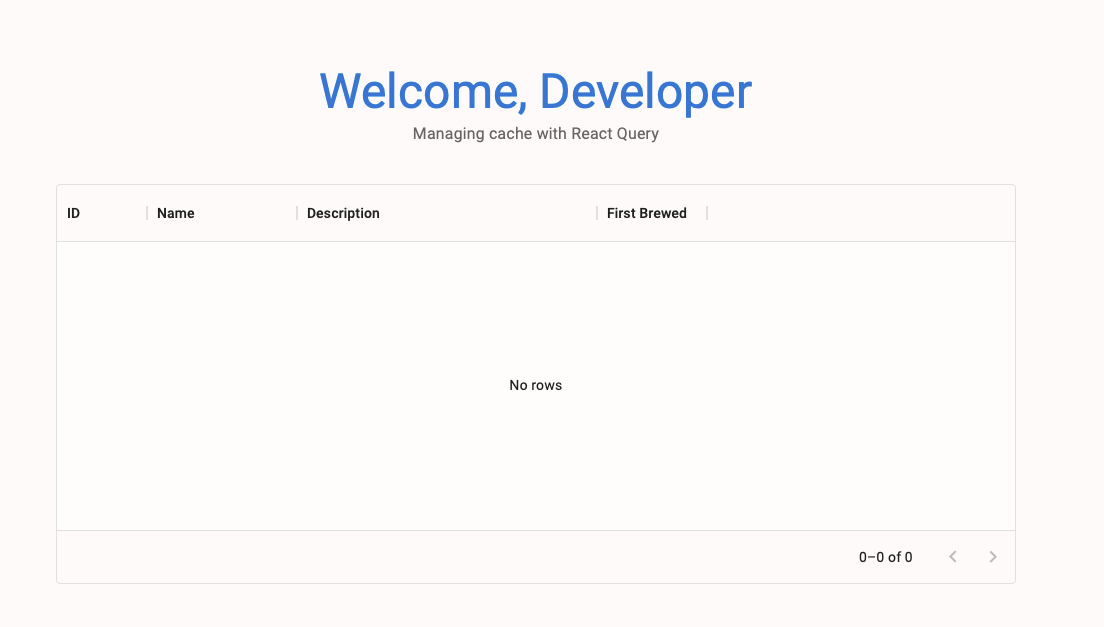
I told you, pretty basic, huh? Well, let’s not forget what this post is about! Allow me to quickly explain what this app is using:
- TypeScript (TS) - The app is written in TypeScript, which is a superset of JavaScript, and it’s a great tool to use when you’re working with React.
- Material-UI (MUI) - A library that helps us build a nice-looking UI.
- The React app was created using Vite.
Cool, guys. So far, we have a React app with some UI components that we can use to interact with the cache library. Let’s move on to the next step, which is to learn how to use the cache library.
PS: I hope you are having a good time, developer 👽
Intro to React Query
In a nutshell, React Query is a library for React apps that helps to manage the cache.
Wait, is that all? “Just” that? Well, by “manage cache” I mean that it handles:
- How, and when, and how often the data is loaded and updated;
- How to identify the data in the cache;
- How to invalidate the cache when the data changes;
- How to access the cache;
- How to clear the cache;
- Functions to create/update/delete data;
- Parallelization of requests;
- Phew…do I need to say more?
It’s a very popular library, used by developers all over the world, and has more than twenty five thousand stars on GitHub!
Now that we all have a basic idea about the cache library (and have our React app up and running!) let’s move on to the next step, which is to learn how to use it.
Installing
First things first, let’s install the library to our React app:
yarn add react-queryQuery Provider
To be able to use the library across the application, we need to wrap our React app with a QueryClientProvider component. This component has the purpose to provide the application with a QueryClient instance, which is used to interact with the cache.
The place that we’re going to use the QueryClientProvider is the root of our React app, on the App.tsx:
import styled from "@emotion/styled";
import { QueryClient, QueryClientProvider } from "react-query";

import { Grid } from "./components/Grid";
import { Title } from "./components/Title";

const client = new QueryClient();

function App() {
  return (
    <QueryClientProvider client={client}>
      <AppWrapper>
        <header>
          <Title />
        </header>
        <MainWrapper>
          <Grid />
        </MainWrapper>
      </AppWrapper>
    </QueryClientProvider>
  );
}
I suspect you will find straightforward to understand what’s going on here, but I just want to highlight the place that we created the query client instance (row 8). It’s outside of the App component, so we don’t create new instances on each render.
The QueryClient instance can receive as parameter the default options that we want to use for the cache. Those options include stuff like the cache’s name, the cache’s version, the cache’s expiration time, data update events. For this tutorial purposes, we’re going to use the default options.
React Query Dev Tools
There’s a fantastic tool to support the development phase of React apps using React Query, which is called React Query Devtools. It’s a great tool to debug and understand how the cache library works. Through it, we can explore the different query status, the cached data, and the cache’s data structure. It’s only included in bundles when process.env.NODE_ENV === 'development', therefore, we don’t have to worry about excluding them during a production build.
It also provides options to customize the position and UI, like the colors, the font, the size, etc.
Shall we add it to our App component to support our development phase, developer?
import styled from "@emotion/styled";
import { QueryClient, QueryClientProvider } from "react-query";
import { ReactQueryDevtools } from "react-query/devtools";

import { Grid } from "./components/Grid";
import { Menu } from "./components/Menu";
import { Title } from "./components/Title";

const client = new QueryClient();

function App() {
  return (
    <QueryClientProvider client={client}>
      <AppWrapper>
        <header>
          <Title />
        </header>
        <MainWrapper>
          <Menu />
          <Grid />
        </MainWrapper>
      </AppWrapper>
      <ReactQueryDevtools />
    </QueryClientProvider>
  );
}
The default options are good enough for our purposes, but feel free to have a look at the possibilities on the documentation page.
Guys, don’t worry about exploring the tool now. In the next step, we’re fetching data so it’ll be more interesting 👌
Fetching Data
It’s time to fetch some data from an API, guys! I have already chosen a beer recipes API, from Punk API, for us to use in our learning exercise (no special reason for the choice, I just enjoy a nice craft beer 🍺).
Hold on, wait a minute! First, we need a function that returns a promise that resolves the data, or throws an error. On Grid.tsx:
import styled from "@emotion/styled";
import { DataGrid, GridColDef, GridRowsProp } from "@mui/x-data-grid";

const columns: GridColDef[] = [
  ...
];

const rows = [] as GridRowsProp[];

const fetchData = async () => {
  const response = await fetch(
    "https://api.punkapi.com/v2/beers"
  );
  const data = await response.json();
  return data;
};

export const Grid = () => {
  return (
    <GridWrapper>
      <DataGrid
        rows={rows}
        columns={columns}
        pageSize={5}
        rowsPerPageOptions={[5]}
        disableSelectionOnClick
      />
    </GridWrapper>
  );
};

...
Cool, easy, right? Now, let’s fetch the data and update the rows array with the data we just fetched!
Queries
As once said by React Query: “A query is a declarative dependency on an asynchronous source of data that is tied to a unique key.”. Profound, isn’t it? Let’s break it down into practical steps so we can understand it!
When using the cache library, a hook is available to be used to fetch data. It’s called useQuery, and we will learn how to use it below on Grid.tsx: (I will explain it in a minute)
import styled from "@emotion/styled";
import { DataGrid, GridColDef, GridRowsProp } from "@mui/x-data-grid";
import { useQuery } from "react-query";

const columns: GridColDef[] = [
  ...
];

const rows = [] as GridRowsProp[];

const fetchData = async () => {
  const response = await fetch("https://api.punkapi.com/v2/beers");
  const data = await response.json();
  return data;
};

export const Grid = () => {
  const query = useQuery("beer-recipes", fetchData);
  return (
    <GridWrapper>
      <DataGrid
        rows={rows}
        columns={columns}
        pageSize={5}
        rowsPerPageOptions={[5]}
        disableSelectionOnClick
      />
    </GridWrapper>
  );
};
...
What do you think? Does it look self-explanatory? You’re right! Using the React Query can be pretty simple, complex sometimes though. Let’s not become too confident just yet 😉 haha
Guys, we informed a unique key to the query (ie, beer-recipes), and we told it to fetch the data using the fetchData function.
Before we dive deep into the useQuery hook, shall we handle the API result and populate our grid? The API returns plenty of fields, but we will only need id, name, tagline, and firstBrewed. On Grid.tsx component:
import styled from "@emotion/styled";
import { DataGrid, GridColDef } from "@mui/x-data-grid";
import { useQuery } from "react-query";

const columns: GridColDef[] = [
  ...
];

const fetchData = async () => {
  const response = await fetch("https://api.punkapi.com/v2/beers");
  const data = await response.json();
  return data;
};

type BeerRecipe = {
  id: number;
  name: string;
  tagline: string;
  first_brewed: string;
};

export const Grid = () => {
  const query = useQuery<BeerRecipe[]>("beer-recipes", fetchData);
  return (
    <GridWrapper>
      <DataGrid
        rows={
          query.data?.map((beer: BeerRecipe) => ({
            id: beer.id.toString(),
            name: beer.name,
            tagline: beer.tagline,
            firstBrewed: beer.first_brewed,
          })) || []
        }
        columns={columns}
        pageSize={5}
        rowsPerPageOptions={[5]}
        disableSelectionOnClick
      />
    </GridWrapper>
  );
};

...
Let me guide you through the changes above, developer:
- We created a new type
BeerRecipethat will be used to convert the API result into an object that we can use in our grid. - We specified to the
useQueryhook what is the data type we expect to receive, as an array. - We mapped the data fetched from the API to a new array that matches the specification of
columns, with the fields we need.
Nice, shall we test our code?
yarn devGrid populated with data? Nice work, developer!
See the React Query icon at the bottom left of your page (in case you haven’t customized its position yet)? Remember, you can only see it because you are running the app in development mode:
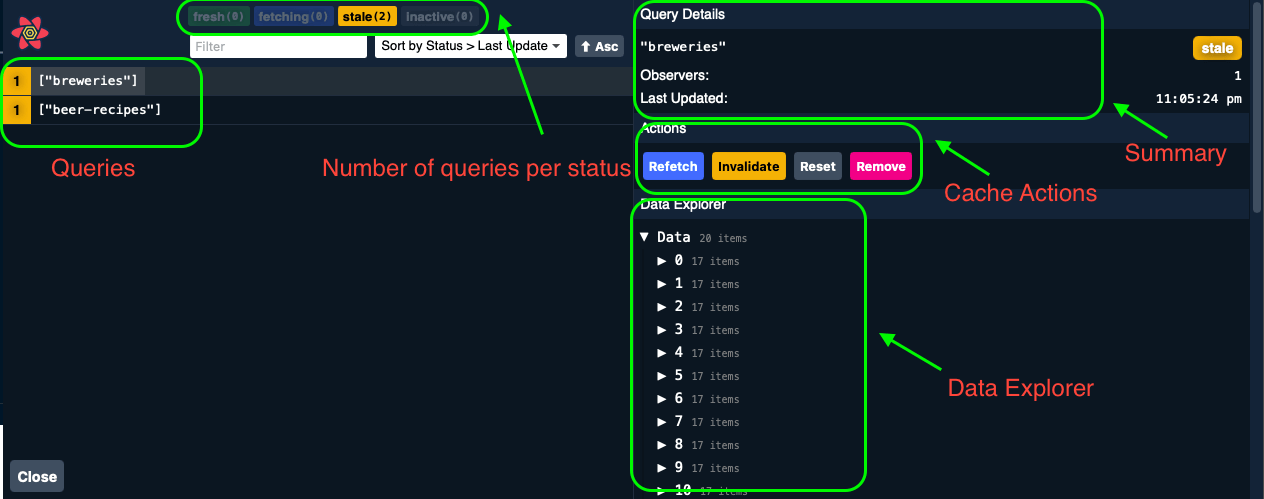
I know that it’s pretty self-explanatory, but I decided to indicate how to use the tool anyway. Take the time to explore and see how it works, developer!
Alright, I assume you are just like me, not satisfied when something “just” works… we must know the theory and how it works under the hood! Fair enough, should we dive into how useQuery works then?
The useQuery Hook
I’ll try my best to give you a good explanation about how the useQuery hook works, without making this post too long or boring. Hopefully, you’ll be able to understand it in a minute or two.
Apart from a variation or two, the useQuery hook is what we use to fetch data from an API, store the result in the cache, and receive a query result object that contains the data and the status of the query. It’s for sure the main function from the library that we will use in our app.
Question, what arguments can I pass to the hook (input)?
- A unique string key, or an unique array of a string and serializable objects (serializable? it means that the object can be converted to a string). So, why do I need an array of objects to describe my query, when I can have just a string instead? Because sometimes a query cannot be identified by a string alone without repeating itself, it might need an extra info such as a page number, or a status, or a child item ID. Have a read here, highly recommended!
- A function that returns a promise. It can be any function, and if fetching APIs, it can be any library such as axios or fetch. What if my function expects a parameter? Good question, remember those additional items to the query key? Yep!
- An object containing the options for the query. Those options include stuff like the cache expiration time, data transformation function, and so on. We will cover some of them in the sections below.
One more question, what the query hook returns (output)?
- The query status (ie, isSuccess, isError, isLoading, isIdle).
- The query result (ie, data, error).
- A property to indicate whenever the query is fetching (ie, isFetching).
Awesome, now that we know how the useQuery hook works, shall we dive into some code?
Queries In Parallel
React Query enables you to fetch data in parallel. This means that you can fetch data from multiple APIs at the same time, even if you don’t exactly the number of APIs to request (confusing a little?). Allow me to explain it with some code, developers.
In the following example, we will fetch data from two APIs at the same time. On Grid.tsx:
...

const columns: GridColDef[] = [
  ...
];

const fetchRecipeData = async () => {
  const response = await fetch("https://api.punkapi.com/v2/beers");
  const data = await response.json();
  return data;
};

const fetchBreweryData = async () => {
  const response = await fetch("https://api.openbrewerydb.org/breweries");
  const data = await response.json();
  return data;
};

type BeerRecipe = {
  id: number;
  name: string;
  tagline: string;
  first_brewed: string;
};

type Brewery = {
  id: number;
  name: string;
  brewery_type: string;
  country: string;
  created_at: string;
};

export const Grid = () => {
  // beer recipe API
  const recipeQuery = useQuery<BeerRecipe[]>("beer-recipes", fetchRecipeData);
  // brewery API
  const breweryQuery = useQuery<Brewery[]>("breweries", fetchBreweryData);

  return (
    <>
      <GridWrapper>
        <DataGrid
          rows={
            recipeQuery.data?.map((beer: BeerRecipe) => ({
              id: beer.id.toString(),
              name: beer.name,
              tagline: beer.tagline,
              firstBrewed: beer.first_brewed,
            })) || []
          }
          columns={columns}
          pageSize={5}
          rowsPerPageOptions={[5]}
          disableSelectionOnClick
        />
      </GridWrapper>
      <ContentWrapper>
        <b>Top 3 breweries in the United States:</b>
        {[...new Set(breweryQuery.data?.map((e) => `${e.name}-${e.country}`))]
          ?.sort((a, b) => (a < b ? -1 : 1))
          .slice(0, 3)
          .map((brewery: string, index: number) => (
            <div key={brewery}>
              <p>
                {index + 1} - {brewery}
              </p>
            </div>
          ))}
      </ContentWrapper>
    </>
  );
};

const GridWrapper = styled("div")`
  height: 400px;
  width: 100%;
  margin: 10px 0;
`;

const ContentWrapper = styled("div")`
  width: 100%;
  margin: 10px 0;
`;
What I want to show you, is just that you can have as many useQuery hooks as you want, and they will be executed in parallel.
Next, think about the scenario where you have a list of items, and you want to fetch specific data for each item in parallel. Therefore, for this case, we can’t just run a bunch of queries in parallel using multiple useQuery hooks, because we don’t know yet what items we want to fetch data for.
Okay, you might think that a simple for each loop with a useQuery hook inside each iteration would be enough, am I right? But guess what, spoiler alert, it’s not!
Run Query For Each
We need to use another hook, called useQueries (plural). It accepts an array of query options, and returns an array of query results (simple as that 😉 plus, it runs all asynchronously!).
To illustrate its usage, let’s create a new component that will fetch data for a list of breweries. For each brewery, we will fetch its city location. We can present this data on the UI through a simple list.
Please, note that we are using examples that in a real world wouldn’t make sense, but what we really want is to learn how to use the library for different use cases (no judgment, please!).
First, let’s create a new component that will fetch data for a list of beers, named BrewerySummary:
import styled from "@emotion/styled";
import { Typography } from "@mui/material";
import { useQueries } from "react-query";

interface BrewerySummaryProps {
  breweryIDs: number[];
}

type Brewery = {
  id: number;
  name: string;
  city: string;
  country: string;
  created_at: string;
};

export const BrewerySummary = ({ breweryIDs }: BrewerySummaryProps) => {
  const queries = useQueries(
    breweryIDs.map((id: number) => ({
      queryKey: ["beer-summary", id],
      queryFn: async (): Promise<Brewery[]> => {
        const response = await fetch(
          `https://api.openbrewerydb.org/breweries/${id}`
        );
        const data = await response.json();
        return data;
      },
    }))
  );

  const data = queries.flatMap((query) => query.data);
  const isLoading = queries.some(({ isLoading }) => isLoading);
  const isError = queries.some(({ isError }) => isError);

  if (isLoading) return <Typography>Loading...</Typography>;
  if (isError) return <Typography>Error to load.</Typography>;

  return (
    <ContentWrapper>
      <b>Top 3 oldest breweries in the United States:</b>
      {[
        ...new Set(
          data
            .filter((e) => e?.country === "United States")
            .sort((a, b) =>
              (b?.created_at ?? Date.UTC.toString()).localeCompare(
                a?.created_at ?? Date.UTC.toString()
              )
            )
            .map((e) => e?.name)
        ),
      ]
        .slice(0, 3)
        .map(
          (brewery: string | undefined, index: number) =>
            brewery && (
              <div key={brewery}>
                <p>
                  {index + 1} - {brewery}
                </p>
              </div>
            )
        )}
    </ContentWrapper>
  );
};

const ContentWrapper = styled("div")`
  width: 100%;
  margin: 10px 0;
`;
Developers, please note the rows 18-29 and 31-33 in the code above. That’s what really matters, the rest is just for the sake of the example:
- 18-29: We’re using the
useQuerieshook, and for each item in thebreweryIDsarray, we’re creating a new query object where the brewery ID is used for the query key. - 31-33: We’re transforming the
useQueriesresult array into a couple of query status indicators (isLoading, isError) and a data array.
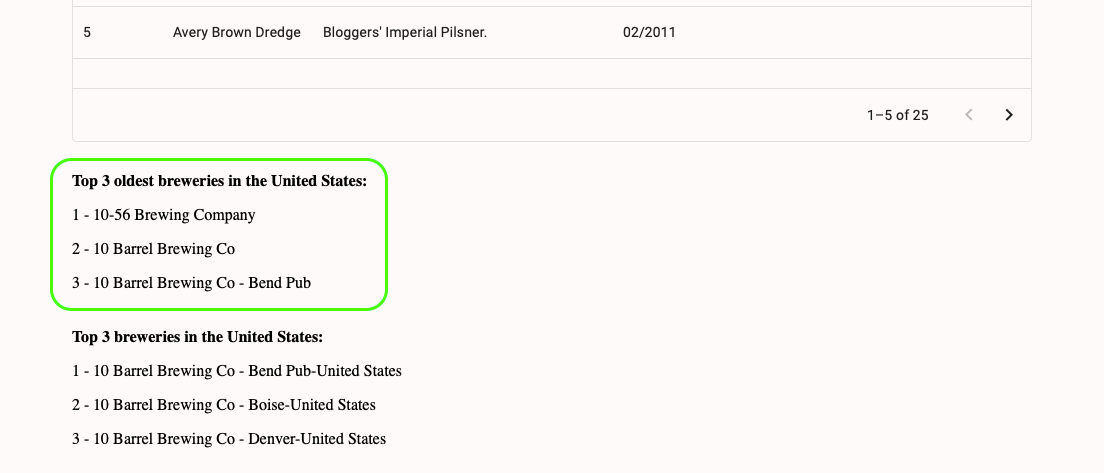
Cool, let’s see this new component on the app page. We must just import it to the Grid component and pass the proper props to it:
import styled from "@emotion/styled";
import { DataGrid, GridColDef } from "@mui/x-data-grid";
import { useQuery } from "react-query";

import { BrewerySummary } from "../BrewerySummary";

...

export const Grid = () => {
  // beer recipe API
  const recipeQuery = useQuery<BeerRecipe[]>("beer-recipes", fetchRecipeData);
  // brewery API
  const breweryQuery = useQuery<Brewery[]>("breweries", fetchBreweryData);

  return (
    <>
      <GridWrapper>
        <DataGrid
          rows={
            recipeQuery.data?.map((beer: BeerRecipe) => ({
              id: beer.id.toString(),
              name: beer.name,
              tagline: beer.tagline,
              firstBrewed: beer.first_brewed,
            })) || []
          }
          columns={columns}
          pageSize={5}
          rowsPerPageOptions={[5]}
          disableSelectionOnClick
        />
      </GridWrapper>
      {breweryQuery.data && (
        <ContentWrapper>
          <BrewerySummary breweryIDs={breweryQuery.data.map((e) => e.id)} />
        </ContentWrapper>
      )}
      <ContentWrapper>
        <b>Top 3 breweries in the United States:</b>
        {[...new Set(breweryQuery.data?.map((e) => `${e.name}-${e.country}`))]
          ?.sort((a, b) => (a < b ? -1 : 1))
          .slice(0, 3)
          .map((brewery: string, index: number) => (
            <div key={brewery}>
              <p>
                {index + 1} - {brewery}
              </p>
            </div>
          ))}
      </ContentWrapper>
    </>
  );
};

...
All good, developer? Same on your side?
Next, what if we want to only run a query if a certain condition is met? Follow me, developer!
Dependent Queries
In React Query, we can pass a boolean value to the query function to indicate whether the query should be run or not. This is one of the options that we can set to the useQuery hook (or to the useQueries hook).
For illustration, let’s say we want to know what kind of food goes well with a certain type of beer (useful info, isn’t it?). So, when an user selects a row on the grid, we present a simple label below it to inform the food pairing.
First of all, a simple React useState and event click on the grid row:
import styled from "@emotion/styled";
import { DataGrid, GridColDef } from "@mui/x-data-grid";
import { useState } from "react";
import { useQuery } from "react-query";

...

export const Grid = () => {
  const [selectedRowID, setSelectedRowID] = useState<number | null>(null);

  // beer recipe API
  const recipeQuery = useQuery<BeerRecipe[]>("beer-recipes", fetchRecipeData);
  // brewery API
  const breweryQuery = useQuery<Brewery[]>("breweries", fetchBreweryData);

  return (
    <>
      <GridWrapper>
        <DataGrid
          rows={
            recipeQuery.data?.map((beer: BeerRecipe) => ({
              id: beer.id.toString(),
              name: beer.name,
              tagline: beer.tagline,
              firstBrewed: beer.first_brewed,
            })) || []
          }
          columns={columns}
          pageSize={5}
          rowsPerPageOptions={[5]}
          disableSelectionOnClick
          onRowClick={(row) => setSelectedRowID(row["id"] as number)}
        />
      </GridWrapper>

      ...

    </>
  );
};

...
No big deal. Next, let’s add a new React Query hook that only runs if the selectedRowID is not null:
...

export const Grid = () => {
  const [selectedRowID, setSelectedRowID] = useState<number | null>(null);

  // beer recipe API
  const recipeQuery = useQuery<BeerRecipe[]>("beer-recipes", fetchRecipeData);
  // brewery API
  const breweryQuery = useQuery<Brewery[]>("breweries", fetchBreweryData);
  // food pairing query
  const foodQuery = useQuery<BeerRecipe[]>(
    ["food-pairing", selectedRowID],
    async () => {
      if (selectedRowID) {
        const response = await fetch(
          `https://api.punkapi.com/v2/beers/${selectedRowID}`
        );
        const data = await response.json();
        return data;
      }
      return [];
    },
    {
      enabled: !!selectedRowID,
    }
  );

  ...
Last but not least, we render the food pairing label according to the foodQuery result:
import styled from "@emotion/styled";
import { DataGrid, GridColDef } from "@mui/x-data-grid";
import { useState } from "react";
import { useQuery } from "react-query";

...

type BeerRecipe = {
  id: number;
  name: string;
  tagline: string;
  first_brewed: string;
  food_pairing: string[];
};

...

export const Grid = () => {
  const [selectedRowID, setSelectedRowID] = useState<number | null>(null);

  // beer recipe API
  const recipeQuery = useQuery<BeerRecipe[]>("beer-recipes", fetchRecipeData);
  // brewery API
  const breweryQuery = useQuery<Brewery[]>("breweries", fetchBreweryData);
  // food pairing query
  const foodQuery = useQuery<BeerRecipe[]>(
    ["food-pairing", selectedRowID],
    async () => {
      if (selectedRowID) {
        const response = await fetch(
          `https://api.punkapi.com/v2/beers/${selectedRowID}`
        );
        const data = await response.json();
        return data;
      }
      return [];
    },
    {
      enabled: !!selectedRowID,
    }
  );

  return (
    <>
     ...

      <ContentWrapper>
        {!foodQuery.isLoading && !foodQuery.isError && foodQuery.data && (
          <p>Food Pairing: {foodQuery.data[0].food_pairing.join(", ")}.</p>
        )}
      </ContentWrapper>

      ...

    </>
  );
};

...
See how we check for the query status before rendering the data? By knowing what status the query is in, we can render the data accordingly (showing some error message, or loading indicator).
Next Steps
Ladies and Gents, to avoid you guys getting bored or this post becoming too long, I believe we have got to a good level of understanding of React Query 👌
There are a lot more content to learn and explore about the library, such as Mutations, Placeholder Query Data, Pagination,. We can continue this learning journey on a new future post! What do you think? Sound interesting? Let me know what you think ✌️
I hope to have given you the motivation to continue learning React Query. With all that we learned today, you are more than ready to start using it in your next project!
On the main branch of this post GitHub repo, you will find the final solution with all the code examples we did together!
Useful Resources
Conclusion
A huge thank you to everyone that have followed me in this journey to learn React Query 🔥 and I hope you enjoyed it!
If you have any questions, feedback, or suggestions, please don’t hesitate to reach out to me through our Contact page 👍 your opinion is very valuable to me, developer!
Take care, be kind to each other, and see you in the next post 😎