Welcome, developers 🖖 It’s been a while, huh? Yeah, I know. I want to apologize to everyone who follows us! The past few months have been quite busy at work and I wasn’t capable of finding time for new posts, but anyway, here I am back to business finally! I could not be happier to be back to our blog, and to make it alive more than ever 🔥 I’ve got some pretty exciting ideas on new posts!
During this time away, I’ve been thinking about some strategies on how we can make the Welcome, Developer blog reaches a wider audience. The goal is simple, learn together, expand our knowledge, and contribute to each other.
With that in mind, I have decided to approach a couple of cool areas here, such as certifications, algorithms, and data structures. The plan is to make the experience fun and enjoyable through practical exercises and real scenarios, so we stay motived to achieve our goals! Stay tuned, guys 📣
Enough talking, for now, time to focus on today’s subject. Let’s talk about GraphQL, shall we? As I always say, grab your favorite source of caffeine and let’s get our hands dirty 💪
Table of contents
Open Table of contents
Introduction
The definition of GraphQL is simple; it’s a query language for APIs, and a server-side runtime for executing queries by using a type system you define for your data. Right, but what that mean exactly? Think about when you fetch data from a REST API to populate a model, and you end up having to request multiple endpoints to join the data, or at least, only needing a couple of fields returned in a long list of key-value pairs.
Can you imagine already where GraphQL acts? What if there is only a single API endpoint to request, and we could only ask for the data that we need? Yep, that’s when our friend comes to play!
A GraphQL service is responsible for communicating with clients, and also, it’s where the data fields, types, and functions are defined. It can be developed using a wide variety of languages, such as JavaScript, Go, Java, Python, and many others (choose your favorite!).
An important thing to highlight here is that GraphQL is not a database, or even tied to any specific database or storage engine.
The documentation and tutorials available on the GraphQL website are very rich and easy to follow. I highly recommend you all to have a look at it!
In my opinion, once we get used to using GraphQL APIs to fetch data to our apps, there is no turning back 🤓 It’s fun to define the data schema on the server, and at the same level, to query the data on the clients. You guys are gonna see what I’m talking about in a moment!
For this post, we will consume a sample GraphQL API from a React application, using Apollo. As simply well-defined by them, Apollo is the industry-standard GraphQL implementation, providing the data graph layer that connects modern apps to the cloud.
Got your IDE or code editor already opened? Then let’s start putting all this theory in place, developers 🧑💻
Environment Setup
First of all, Node.js is required to start. Download the current version from the official website, or using any other method of your preference such as nvm. Once it’s been installed, run the npm command to ensure it’s all good to start our exercise:
Create React App
Awesome, the next move is to create a new React application! Let’s do it:
npx create-react-app wd-graphql-react-clientJust in case, run the app to ensure there is any errors:
cd wd-graphql-react-client
yarn start
React logo spinning on localhost:3000? Well done, let’s move on!
The objective of today is not to focus on React itself, but how to request GraphQL APIs from apps built using this JS framework. For this same reason, the post won’t cover the basic details of React. However, I always want to make sure all developers can follow regardless of background knowledge.
Building Our App
Allow me to explain the theme of our app. We’re going to build a currency converter app 💰 Well, not something fancy but good enough to present the currency conversion in real-time!
To get started, we will need a data source able to publicly expose the data about the currencies. We’re going to use the same GraphQL API used by Apollo on their documentation, currently running and available on a CodeSandbox instance. This GraphQL server requests data in real-time from the Coinbase API.
To present the requested data, we must customize the app just created a little. I’m a fan of the Material Design, so why not use the Material-UI’s components on our React app?
yarn add @material-ui/core @material-ui/iconsFantastic, now open the app on your IDE or code editor. This is an optional step, but feel free to remove the files that we will not use in this exercise, as highlighted below. Also, do not forget to also remove their references on the index.js (line 3) and App.js (line 1, 2) files.

Perfect, we’re now ready to start coding our Currency Converter app 😎 First step, let’s put some React components in place? What I have planned is:
- An app’s top bar to show the title of our exercise;
- A footer to illustrate a real app;
- A card to represent a currency and its details;
- A search box to search by currency code;
- And, a layout component for standard purposes.
I’ve done the work and have already built the components to save us some time, so you and I can focus only on the purpose of this post, which is consuming GraphQL APIs!
But first, a couple of changes on the index.html file to make our pages look even better with Material-UI:
<!DOCTYPE html>
<html lang="en">
  <head>
    <meta charset="utf-8" />
    <link rel="icon" href="%PUBLIC_URL%/favicon.ico" />
    <meta
      name="viewport"
      content="minimum-scale=1, initial-scale=1, width=device-width"
    />
    <meta name="theme-color" content="#000000" />
    <meta
      name="description"
      content="Web site created using create-react-app"
    />
    <link rel="apple-touch-icon" href="%PUBLIC_URL%/logo192.png" />
    <link rel="manifest" href="%PUBLIC_URL%/manifest.json" />
    <link
      rel="stylesheet"
      href="https://fonts.googleapis.com/css?family=Roboto:300,400,500,700&display=swap"
    />
    <link
      rel="stylesheet"
      href="https://fonts.googleapis.com/icon?family=Material+Icons"
    />
    <title>Currency Converter App | Welcome, Developer</title>
  </head>

  <body>
    <noscript>You need to enable JavaScript to run this app.</noscript>
    <div id="root"></div>
  </body>
</html>
Now, inside the src folder, please create a new folder called components. Next, create the following JSX files and copy each respective code: (remember, the goal is only to save time!)
TopBar.jsx
import React from "react";
import { makeStyles } from "@material-ui/core/styles";
import { AppBar, Toolbar, Typography } from "@material-ui/core";

const useStyles = makeStyles((theme) => ({
  root: {
    height: "50px",
    background:
      "linear-gradient(90deg, rgba(109,78,238,1) 0%, rgba(164,36,134,1) 63%)",
  },
}));

const TopBar = () => {
  const classes = useStyles();
  return (
    <AppBar position="static" className={classes.root}>
      <Toolbar>
        <Typography variant="h6">
          {`Currency Converter App | Welcome, Developer`}
        </Typography>
      </Toolbar>
    </AppBar>
  );
};

export default TopBar;
Footer.jsx
import React from "react";
import { makeStyles } from "@material-ui/core/styles";
import Typography from "@material-ui/core/Typography";

const useStyles = makeStyles((theme) => ({
  root: {
    height: "50px",
  },
  footer: {
    textTransform: "uppercase",
  },
}));

const Footer = () => {
  const classes = useStyles();
  return (
    <div className={classes.root}>
      <Typography
        variant="body2"
        color="textSecondary"
        align="center"
        className={classes.footer}
      >
        {"Copyright © Currency Converter - Welcome, Developer"}{" "}
        {new Date().getFullYear()}
        {"."}
      </Typography>
    </div>
  );
};

export default Footer;
SearchBox.jsx
import React, { useState } from "react";
import { Grid, TextField, Button } from "@material-ui/core";
import MonetizationOnIcon from "@material-ui/icons/MonetizationOn";

const SearchBox = ({ handleSubmit }) => {
  const [currency, setCurrency] = useState(null);
  const handleCurrency = (event) => {
    setCurrency(event.target.value);
  };
  return (
    <Grid
      container
      direction="row"
      justify="flex-start"
      alignItems="center"
      spacing={2}
    >
      <Grid item>
        <TextField
          id="movie-id-text"
          label="Currency Code"
          variant="outlined"
          autoFocus
          margin="dense"
          onChange={handleCurrency}
          required
        />
      </Grid>
      <Grid item>
        <Button
          color="primary"
          variant="contained"
          onClick={() => handleSubmit(currency)}
          startIcon={<MonetizationOnIcon />}
        >{`Convert`}</Button>
      </Grid>
    </Grid>
  );
};

export default SearchBox;
CurrencyCard.jsx
import React from "react";
import { makeStyles } from "@material-ui/core/styles";
import { Card, CardContent, Typography } from "@material-ui/core";
import numeral from "numeral";

const useStyles = makeStyles({
  root: {
    width: "250px",
    maxHeight: "100px",
  },
});

const CurrencyCard = (props) => {
  const classes = useStyles();
  return (
    <Card className={classes.root}>
      <CardContent>
        <Typography variant="h5" component="h2">
          {props.currency}
        </Typography>
        <Typography className={classes.pos} color="textSecondary">
          {props.name || "(Not defined)"}
        </Typography>
        <Typography variant="body2" component="p">
          {`$1 ${props.base} = ${numeral(props.rate).format("$0,0.00")} ${
            props.currency
          }`}
        </Typography>
      </CardContent>
    </Card>
  );
};

export default CurrencyCard;
CurrencyList.jsx
import React, { useState } from "react";
import { makeStyles } from "@material-ui/core/styles";
import { Grid } from "@material-ui/core";

// components
import SearchBox from "./SearchBox";

const useStyles = makeStyles((theme) => ({
  root: {
    flexGrow: 1,
    margin: theme.spacing(5),
  },
}));

const CurrencyList = () => {
  const classes = useStyles();
  const [currency, setCurrency] = useState(null);

  // handle get rates
  const handleSubmit = (currency) => {
    setCurrency(currency);
  };

  return (
    <div className={classes.root}>
      <Grid container spacing={3}>
        <Grid item xs={12}>
          <SearchBox handleSubmit={handleSubmit} />
        </Grid>
        <Grid item xs={12}>
          <div>Currency data in here!</div>
        </Grid>
      </Grid>
    </div>
  );
};

export default CurrencyList;
Layout.jsx
import React from "react";
import { makeStyles } from "@material-ui/core/styles";
// components
import Footer from "./Footer";
import TopBar from "./TopBar";

const useStyles = makeStyles((theme) => ({
  content: {
    minHeight: "calc(100vh - 50px - 50px)", // 50px top bar and footer height
  },
}));

const Layout = ({ children }) => {
  const classes = useStyles();
  return (
    <>
      <TopBar />
      <main className={classes.content}>{children}</main>
      <Footer />
    </>
  );
};

export default Layout;
And last but not least, the existing App.js file:
import React from "react";
import Typography from "@material-ui/core/Typography";

// components
import Layout from "./components/Layout";
import CurrencyList from "./components/CurrencyList";

function App() {
  return (
    <Layout>
      <div style={{ marginTop: 20 }}>
        <Typography variant="h5">{`Query currency rates in real time!`}</Typography>
      </div>
      <CurrencyList />
    </Layout>
  );
}

export default App;
Awesome, guys! We don’t need to worry about layout from now on! However, if you interest in the changes we’ve done above, the code is quite simple. Basically, it is all about React states and Material-UI components. I encourage you to have a quick look at the React, and the Material-UI, documentations.
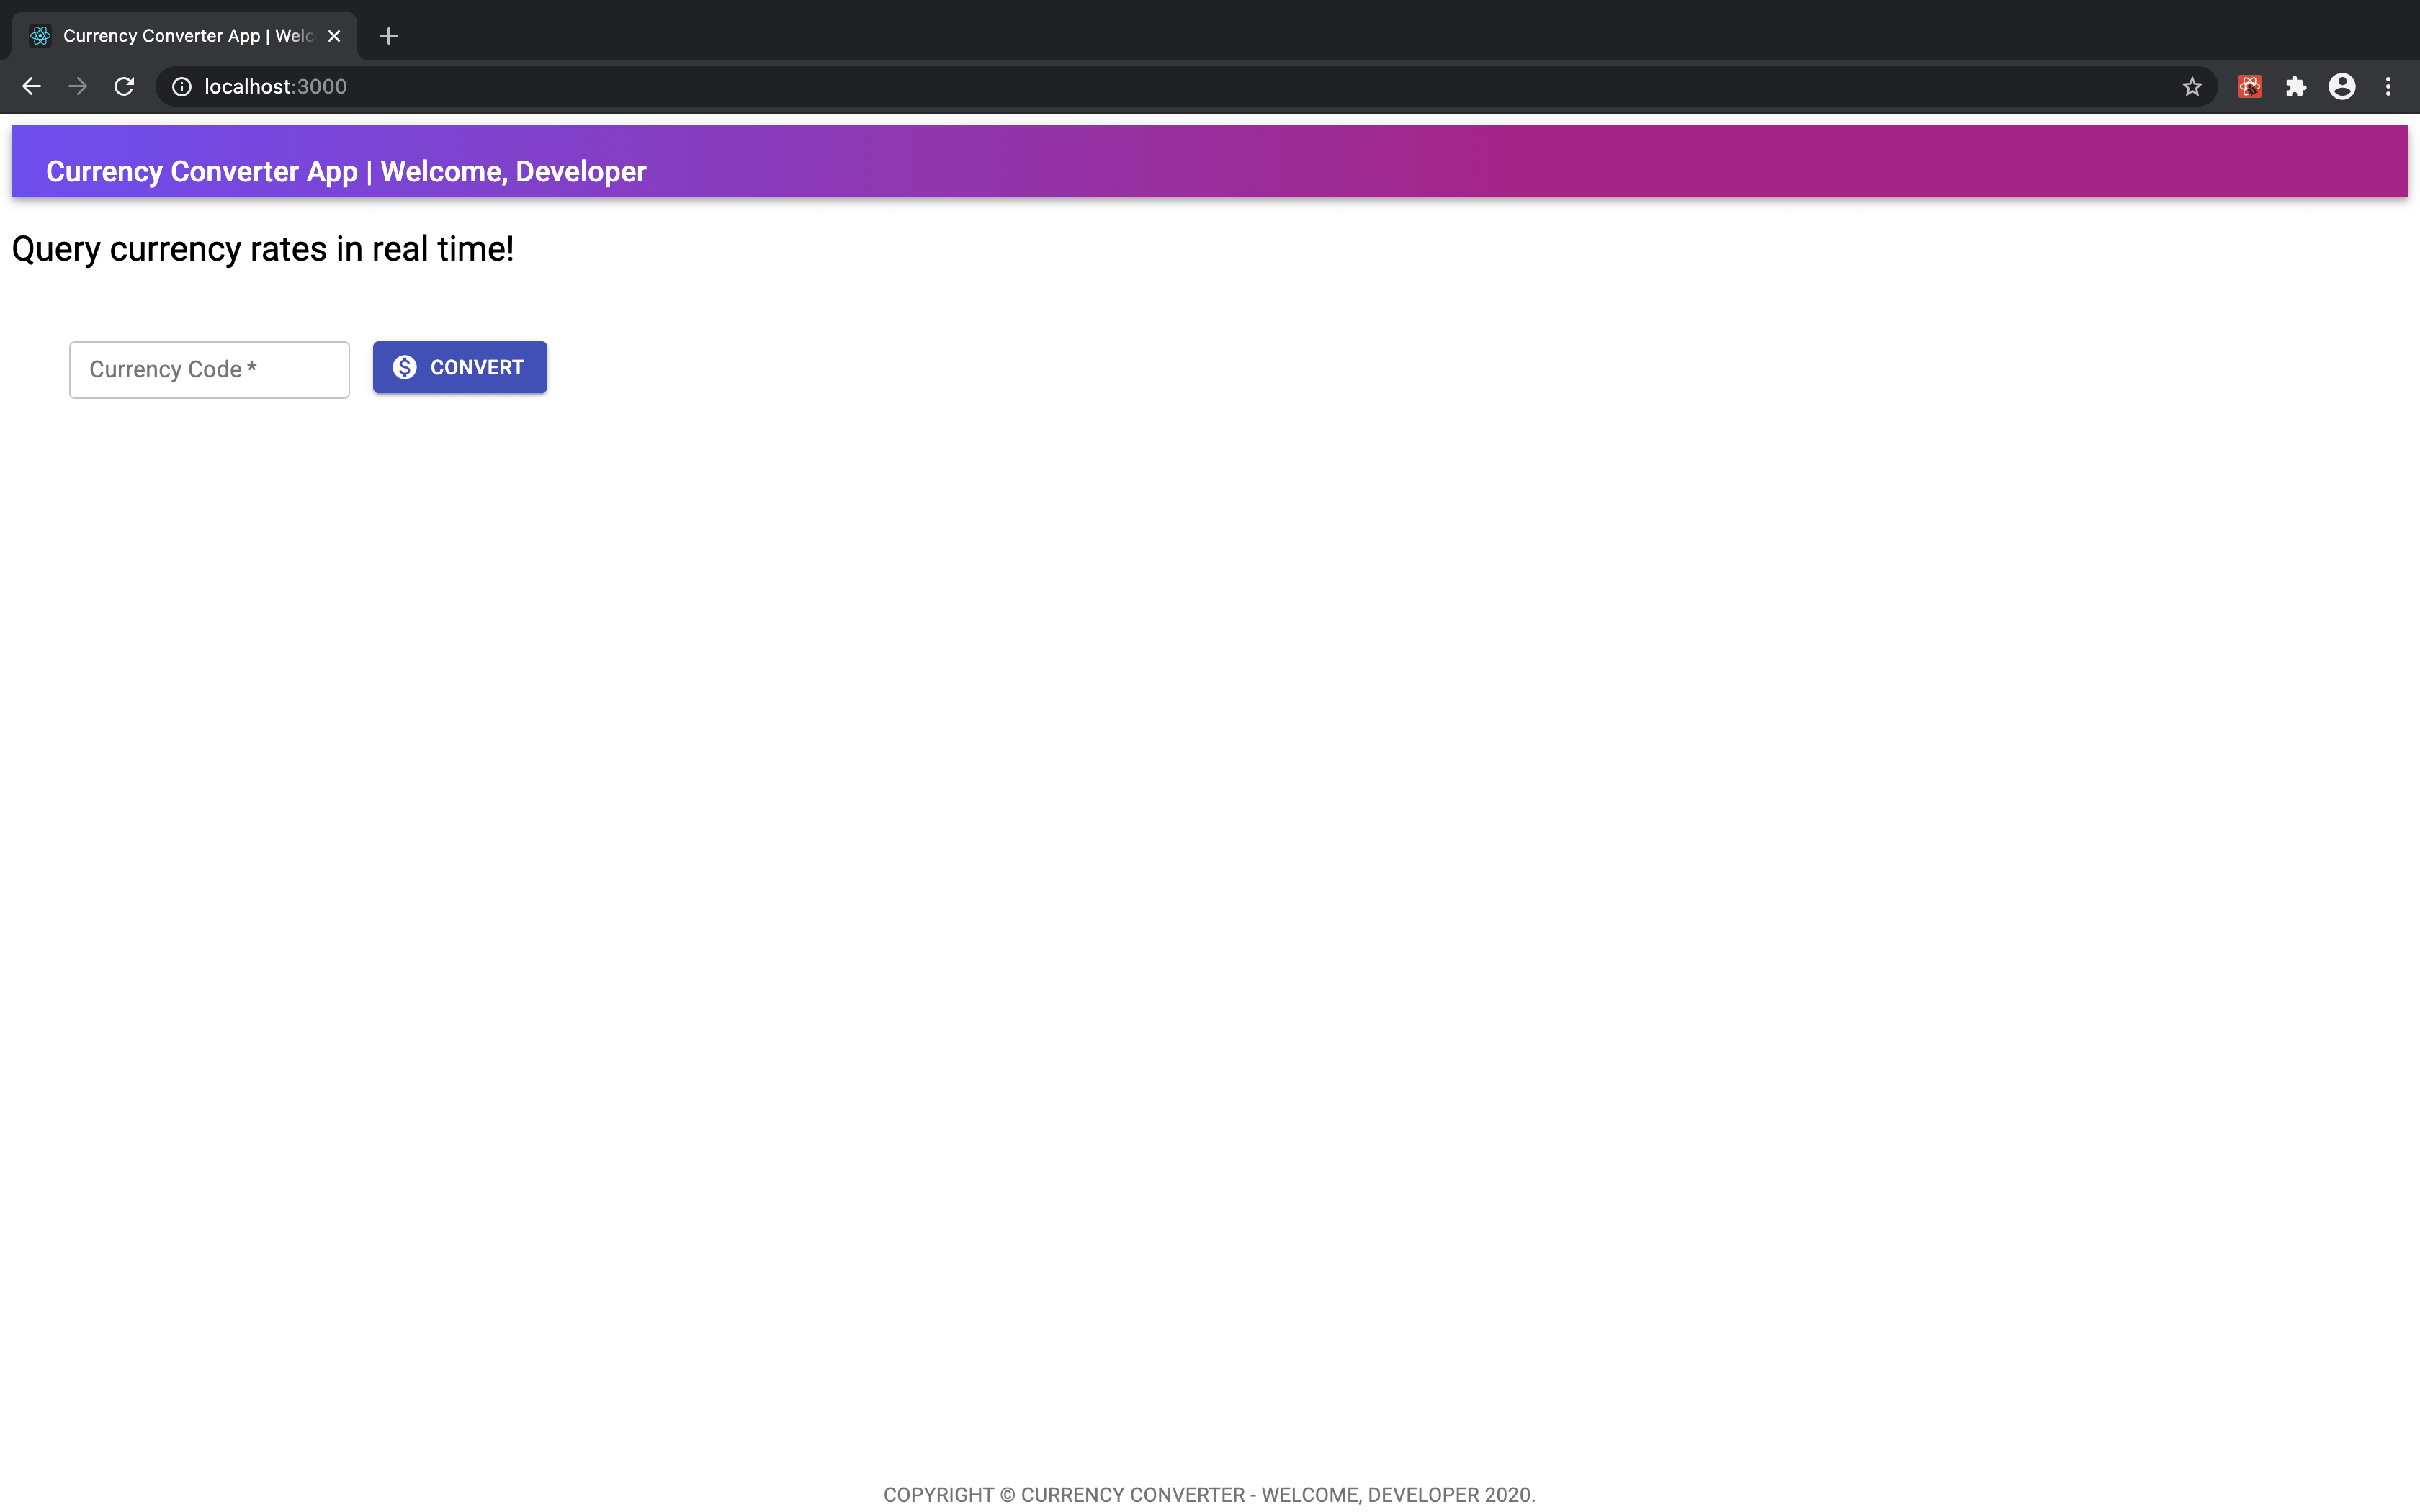
If our app is up and running, we can move to the next step! Is it the same as below on your side?
Sweet as, guys! In the next chapter, we will learn how to fetch data from a GraphQL API!
Apollo Client
The Apollo Client is a state management library for JavaScript that enables us to consume and manage local and remote data with GraphQL. By using it, we can fetch, modify, and subscribe to data. It was designed for React applications, but also supports other frameworks such as Angular and Vue.
Using React’s Hooks API, Apollo encapsulates the data management tasks of fetching data, handling cache, tracking loading states and errors, and updating the UI for you. I highly recommend you to read more about Apollo Client and dive deeper into its documentation.
Let’s implement this cool library to our Currency Converter app! Btw, if you are using Visual Studio Code as your code editor, have a look at the Apollo Client extension (and color theme)!
npm install @apollo/client graphqlBefore start querying the data, it’s crucial that we initialize an instance of the Apollo Client. This instance is going to receive, as properties, the configuration values about the connection with the GraphQL server, such as API address and cache settings.
For the purpose of our exercise today, a simple client setup is good enough! However, there are plenty of options available, for example, adding authentication or even customizing response logic. We can explore it a bit more later on!
First, create a new folder called ApolloClient, under src. Second, add a new file called client.js. Our Apollo Client’s instance is setup as following:
import { ApolloClient, InMemoryCache } from "@apollo/client";

export const client = new ApolloClient({
  uri: "https://48p1r2roz4.sse.codesandbox.io", // Coinbase GraphQL API
  cache: new InMemoryCache(),
});
Yep, that’s the only configuration we need to start! Okay, can we fetch some data, now? Hang on, not so fast…one step still pending! Do you remember that I said Apollo Client is a state management library? So, it behaves as the React Context, which we would include on top of our application. Let’s do the same with Apollo Client then.
Back to our App.js file, please apply the following changes:
import React from "react";
import { ApolloProvider } from "@apollo/client";
import { client } from "./ApolloClient/client";
import Typography from "@material-ui/core/Typography";

// components
import Layout from "./components/Layout";
import CurrencyList from "./components/CurrencyList";

function App() {
  return (
    <ApolloProvider client={client}>
      <Layout>
        <div style={{ marginTop: 20 }}>
          <Typography variant="h5">{`Query currency rates in real time!`}</Typography>
        </div>
        <CurrencyList />
      </Layout>
    </ApolloProvider>
  );
}

export default App;
As you can see above, we have added the ApolloProvider high in our application so any component below it has access to the GraphQL data. The provider receives an instance of the ApolloClient to establish a connection with the GraphQL server.
Our code is ready to start requesting data! Next, we will talk about GraphQL queries.
GraphQL Queries
Apollo Client uses a React hook called useQuery to share GraphQL data with the UI. It receives a query as a parameter and returns a result object that contains loading, error, and data properties.
The query error and loading states are represented through the loading and error properties, while the result of the query is attached to the data property. It’s all handled by Apollo Client!
A GraphQL query is created by passing a string in a specific format to a gql function. Let me show you an example below:
import { gql, useQuery } from "@apollo/client";

const GET_USERS = gql`
  query GetUsers {
    users {
      id
      name
    }
  }
`;
The query text has a specific format and matches the data schema predefined by the GraphQL API. To get familiar with the query format, and to explore the fields and functions available to be requested, let’s use a pretty cool tool called GraphQL Playground. Open the URL of the GraphQL server we are using in this exercise (https://48p1r2roz4.sse.codesandbox.io) on your browser. In this page, you can play with the queries and learn more about the data schema! You’ll notice that the same queries you run on the playground, are passed to the gql function on the React app.
Getting there, developer! Once you become familiar with the queries and schema on the playground page, move on to the CurrencyList.jsx React component on our app. According to the component structure we defined previously, this guy will be responsible for fetching the data and present it in the form of cards.
So, let’s open the file and apply the following changes to it:
import React, { useState } from "react";
import { makeStyles } from "@material-ui/core/styles";
import { Grid } from "@material-ui/core";
import { gql, useQuery } from "@apollo/client";

// components
import SearchBox from "./SearchBox";
import CurrencyCard from "./CurrencyCard";

const useStyles = makeStyles((theme) => ({
  root: {
    flexGrow: 1,
    margin: theme.spacing(5),
  },
  form: {
    flex: 1,
    display: "flex",
  },
  cards: {
    display: "flex",
    justifyContent: "space-between",
  },
}));

// GraphQL query
const GET_CURRENCIES = gql`
  query GetRates {
    rates(currency: "USD") {
      currency
      name
      rate
    }
  }
`;

const CurrencyList = () => {
  const classes = useStyles();
  const [currency, setCurrency] = useState(null);
  const { loading, error, data } = useQuery(GET_CURRENCIES);

  // handle get rates
  const handleSubmit = (currency) => {
    setCurrency(currency);
  };

  const handleData = (data, currency) => {
    if (data.rates) {
      return data.rates.map((item, e) => (
        <Grid item>
          <CurrencyCard
            key={e}
            base={currency}
            rate={item.rate}
            currency={item.currency}
            name={item.name}
          />
        </Grid>
      ));
    } else {
      return <div>{`No records have been found for the currency.`}</div>;
    }
  };
  return (
    <div className={classes.root}>
      <Grid container spacing={3}>
        <Grid item xs={12}>
          <SearchBox handleSubmit={handleSubmit} />
        </Grid>
        <Grid item xs={12}>
          {/* while waiting for query response */}
          {loading && <div>{`Loading, please wait...`}</div>}
          {/* in case of query error */}
          {error && <div>{`Request error.`}</div>}
          {/* present currency list */}
          {data && (
            <Grid container spacing={1}>
              {handleData(data, currency)}
            </Grid>
          )}
        </Grid>
      </Grid>
    </div>
  );
};

export default CurrencyList;
Allow me to explain the changes, guys:
- (line 4) Imported the gql function and useQuery hook
- (line 25-34) Defined the GraphQL with a default currency parameter
- (line 39) Executed query and returned the properties from the result object
- (line 46-61) A simple JS function to handle the data returned, and present each currency in the CurrencyCard component
- (line 70-79) Show the content of the page based on the query response state (loading, error, data)
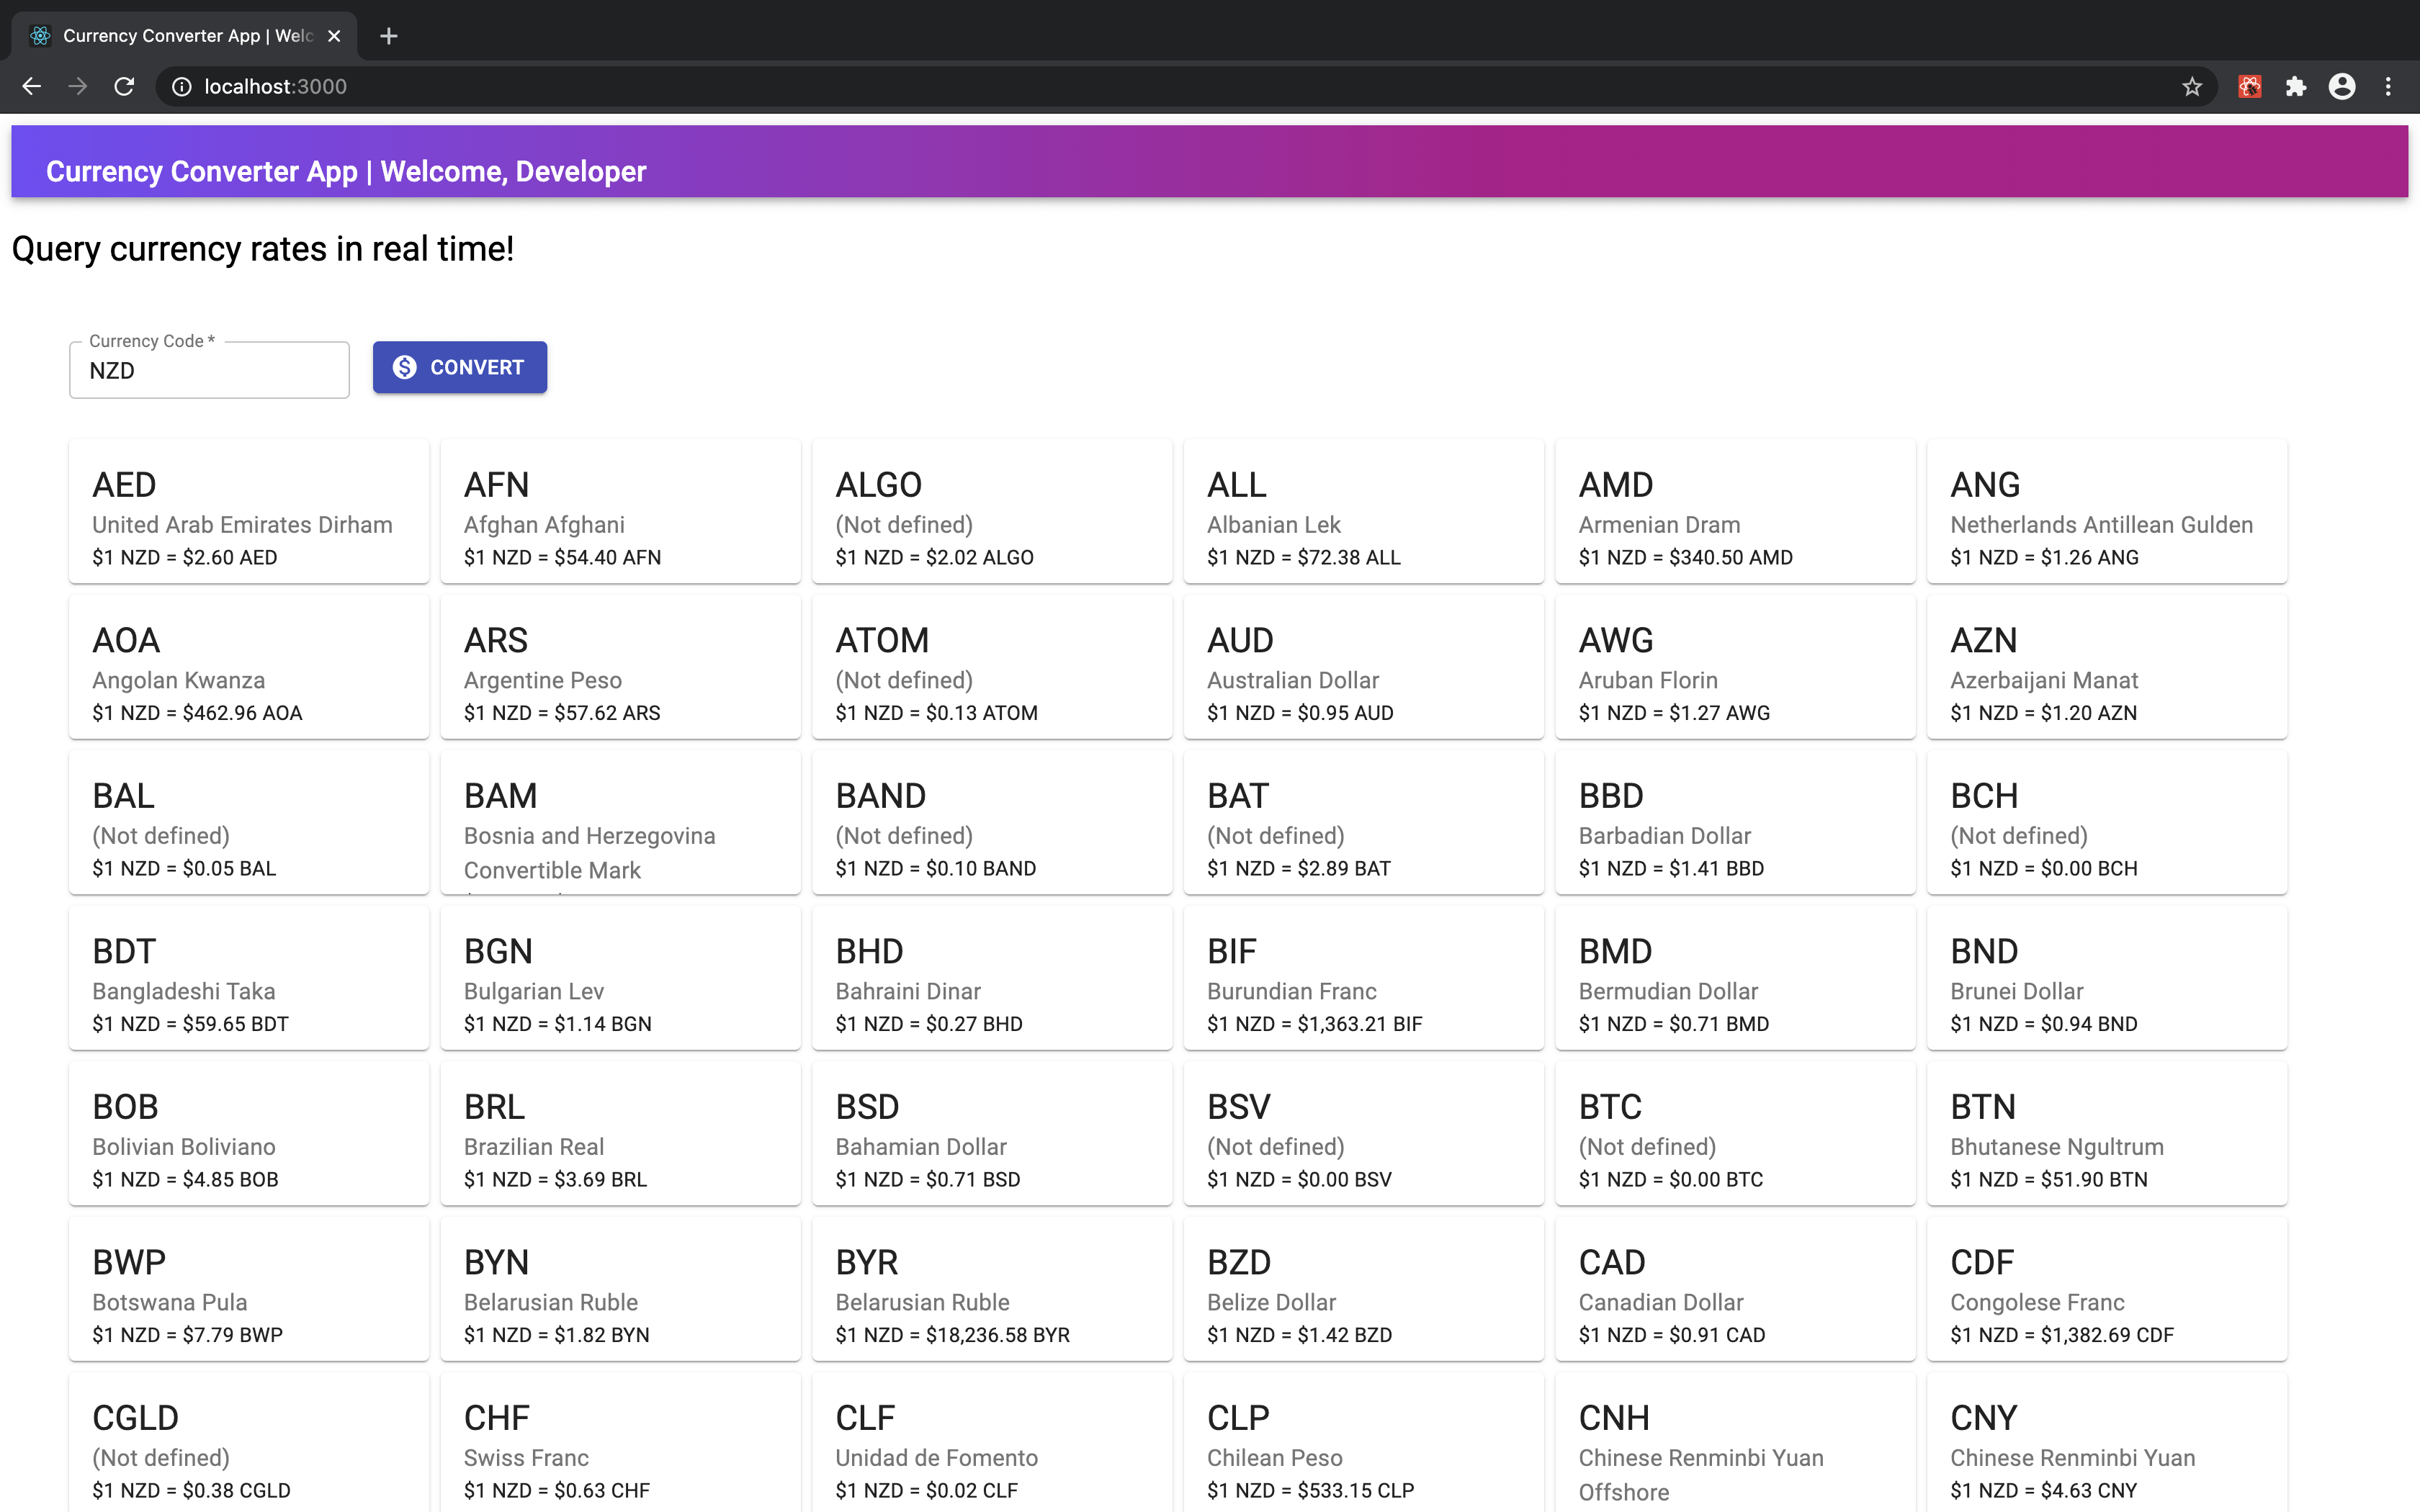
Now, run the app and check if you are getting the data presented properly on your page 🤞

Congrats, guys! We’ve just performed our first GraphQL query 🥳
Right, although we are getting the data from the API, it isn’t behaving as expected. The ideal in our specific exercise is to request the data once the user has informed a currency code on the text field and clicked on the Convert button.
How to invoke then the gql function only an event is triggered (button click)? It’s simple, we need a variation of the useQuery hook, called useLazyQuery. Let me show you next!
Lazy Query Hook
The definition of lazy queries, found on the Apollo Client documentation, couldn’t be more comprehensive. So, I decided to use it here to explain the concept to you:
“The useLazyQuery hook is perfect for executing queries in response to events other than component rendering. This hook acts just like useQuery, with one key exception: when useLazyQuery is called, it does not immediately execute its associated query. Instead, it returns a function in its result tuple that you can call whenever you’re ready to execute the query.”
Fantastic, we only need a couple of changes to our code to start using the useLazyQuery hook. Open the CurrencyList component, and apply the following changes:
import React, { useState } from "react";
import { makeStyles } from "@material-ui/core/styles";
import { Grid } from "@material-ui/core";
import { useLazyQuery, gql } from "@apollo/client";

// components
import SearchBox from "./SearchBox";
import CurrencyCard from "./CurrencyCard";

const useStyles = makeStyles((theme) => ({
  root: {
    flexGrow: 1,
    margin: theme.spacing(5),
  },
  form: {
    flex: 1,
    display: "flex",
  },
  cards: {
    display: "flex",
    justifyContent: "space-between",
  },
}));

/// GraphQL Query
const GET_CURRENCIES = gql`
  query GetRates($currency: String!) {
    rates(currency: $currency) {
      currency
      rate
      name
    }
  }
`;

const CurrencyList = () => {
  const classes = useStyles();
  const [currency, setCurrency] = useState(null);
  const [getCurrencies, { loading, data, error }] =
    useLazyQuery(GET_CURRENCIES);

  // handle get rates
  const handleSubmit = (currency) => {
    setCurrency(currency);
    getCurrencies({ variables: { currency } });
  };

  const handleData = (data, currency) => {
    if (data.rates) {
      return data.rates.map((item, e) => (
        <Grid item>
          <CurrencyCard
            key={e}
            base={currency}
            rate={item.rate}
            currency={item.currency}
            name={item.name}
          />
        </Grid>
      ));
    } else {
      return <div>{`No records have been found for the currency.`}</div>;
    }
  };
  return (
    <div className={classes.root}>
      <Grid container spacing={3}>
        <Grid item xs={12}>
          <SearchBox handleSubmit={handleSubmit} />
        </Grid>
        <Grid item xs={12}>
          {/* while waiting for query response */}
          {loading && <div>{`Loading, please wait...`}</div>}
          {/* in case of query error */}
          {error && <div>{`Request error.`}</div>}
          {/* present currency list */}
          {data && (
            <Grid container spacing={1}>
              {handleData(data, currency)}
            </Grid>
          )}
        </Grid>
      </Grid>
    </div>
  );
};

export default CurrencyList;
Let me explain the changes above:
- (line 4) Instead of useQuery, we imported useLazyQuery
- (line 27-28) Added a variable to the query parameter
- (line 39-40) Created a function to execute the query, named getCurrencies
- (line 45) On the handleSubmit function, triggered by the button click, perform the getCurrencies functions to run the query
That’s all, my friends! Try to run the app and inform any currency code of your choice. You should then see the conversion rate with other currencies:
Nicely done, guys. GraphQL isn’t an unknown world for us anymore!
Next Steps
Pretty awesome those GraphQL API queries, huh? Yeah, I agree. I can almost hear your thoughts from here at this moment, developers. You are probably asking yourself, where is the part about mutations and subscriptions? Am I right? 🙋♂️
No need to worry, guys! My idea with this post was to give only an introduction to GraphQL, by learning how to fetch data from APIs on a React application. I’ve already planned the second part of this series, where we will learn how to create a GraphQL server as well as explore more of its concepts and capabilities 👌
I would say we have more fun together coming soon, everyone! In the meanwhile, why not to keep exploring some cool GraphQL resources, guys?
If you are stuck in any step, go to our GitHub repository and download the solution!
Useful Resources
Conclusion
Thank you so much to all of you who have gone through the exercise! It was good fun, wasn’t it? GraphQL is an amazing way of handling data in modern web apps! I would be happy to see you around in the next chapters of this learning journey! I’m going to dive deeper into the concepts, build a GraphQL server in Java (or Node.js), and prepare more cool exercises so we can have some fun together! Sounds good?
I always try my best to cover all details and explain each step in the clearest way possible. I hope you have enjoyed reading this post as much as I have when preparing it ♡
I’m grateful to be back to our blog, guys! Keep up with the hard work, but do not forget to have fun along the way! Otherwise, what’s the point, right? 🤗 See you in the next post, developers!
Follow Us
The Welcome, Developer has a brand new LinkedIn page! If you enjoy our content, we would be very happy to have you as a follower! In there, we will update you about new posts, new projects, and all the cool stuff!