Hey there, Developers 🖖 Welcome to the first post of the New Year 🎉 I truly hope all of you have had an amazing time during Christmas and NYE!
It feels good to had a break from work and studies for a few days, don’t you agree? We are passionate about what we do, no questions about it, but some now and then sitting on the sofa and watching an episode of The Office is welcome (right?!) 😌
Well, I’ve got to say. Our team at Welcome, Developer has so many ideas about pretty cool posts and projects! I’m excited about being back to the very classic crazy developers’ routine! Have you already made your learning schedule for the next months? 🔥 Remember, as Oliver Wendell Holmes, Jr. said:
A mind that is stretched by a new experience can never go back to its old dimensions.
For the first-timers stopping by, I encourage you to explore our previous posts! I bet you would find something cool there (I hope 🤔). In every post, we try our very best to provide you developer with a joyful experience. Our objective is, and always will be, to make this blog not just a place to find & copy code. You know that moment of the day/night to relax and enjoy ourselves? That’s exactly what we aim for with Welcome, Developer 👍
Shall we start today’s subject, guys? Keen to learn more about, or refresh your knowledge on, GraphQL? So let’s do it 🧑💻
Table of contents
Open Table of contents
Introduction
Previously, we have talked about how to fetch data from a GraphQL API using the Apollo React client library. In case you have missed it, take the time to check it out. It’s good fun there, guys!
This time, we are going to talk about the other side of a GraphQL API, the server-side. The goal is to cover a bit of theory about the server features (no worries, I promise no boring stuff!), and then having a good time together building a GraphQL API. Sound good? 👌
When building a GraphQL server, there are quite a few options regarding programming languages you could use. From Java to Node.js, to Golang. Feel free to pick your favorite, and go for it! In this post, we’ll go with Node.js. Why choose Node.js? ‘Cause I thought it’d be interesting for us to explore Apollo Server! Have you heard about it?
Apollo Server is an open-source JavaScript GraphQL server, compatible with any GraphQL client library. Remember the one we used on the previous post, the Apollo Client? Yep, that one too, developers!
Hey by the way, if you feel like diving into GraphQL, get yourself registered for the GraphQL Summit that happens in April this year! Also, the documentation on the Apollo GraphQL website is an excellent learning resource with lots of theory and code!
We’re going to learn about how to define a data schema, build queries, real-time events, data types, and a lot more. To illustrate these concepts, the mission is to build a Nasdaq Exchange GraphQL API! I hope you enjoy the journey I prepared for today, guys 🤘
Agenda
I’ve planned a two-part post for us to learn in-depth the GraphQL back-end. The goal is to make it enjoyable and easy to follow. Here is the schedule for this post series:
- Part One (today)
- Environment Setup
- Introduction to Apollo GraphQL
- GraphQL SDL
- Data Types
- Resolvers
- Apollo Server
- GraphQL Playground
- JSON file as Data Source
- Part Two
- GraphQL Query Arguments
- Prisma
- GraphQL Mutations
- GraphQL Subscriptions
- GraphQL Best Practices
In this post, we will talk about all the cool subjects from part one! Let’s get started!
Environment Setup
The only requirement before we jump in, it’s to have Node.js (8+) installed on our machines. If you haven’t yet, quick download it from the official website. Once installed, run the command npm on your terminal and you should get the following text printed to it:
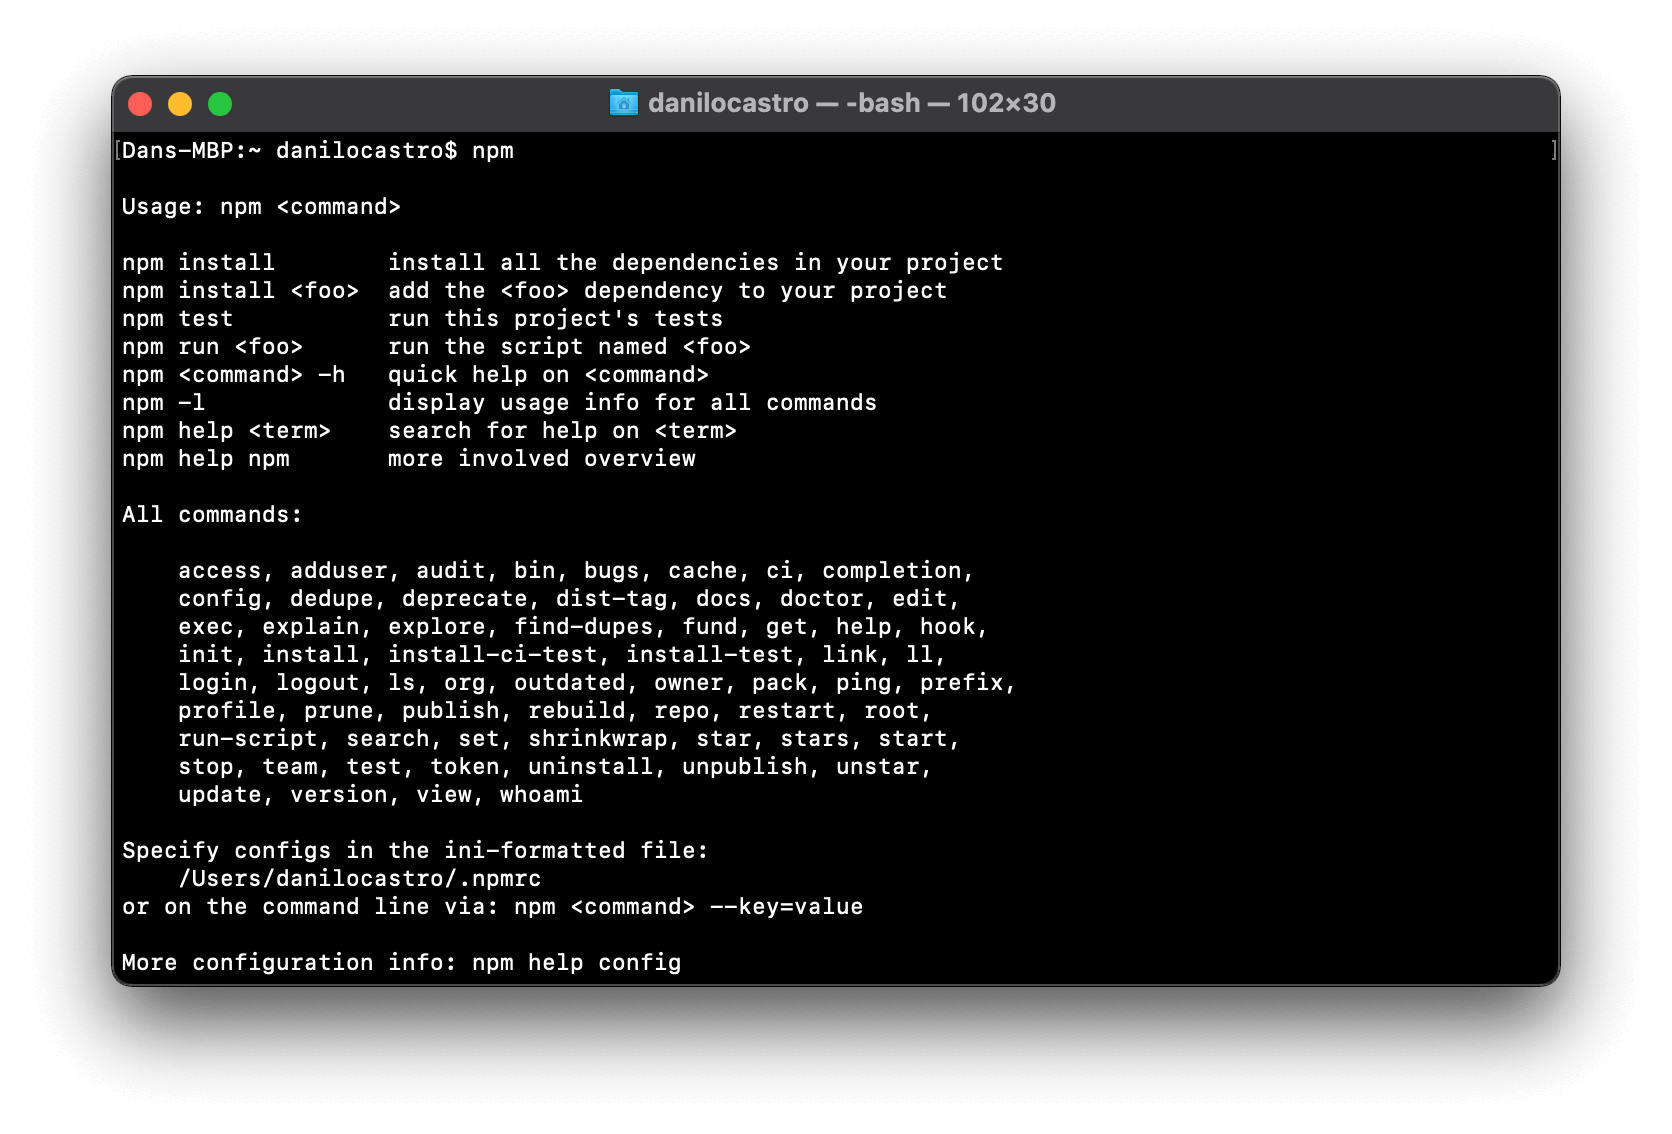
All good, everyone? Good, then let’s move on!
Creating a Node.js App
Next, let’s create our Node.js application. Starting from scratch, we will create a new folder and initialize the app by running the command:
mkdir graphql-server-api-wd
cd graphql-server-api-wd
npm init --yes
Nice, the next step is to install the libraries we’re gonna use in our project. Here it goes:
npm install apollo-server graphql typescriptThe apollo-server library is the core library of Apollo Server, which provides the features for defining the data and how it is consumed by the clients.
The graphl library is used to build a GraphQL schema and execute queries against it.
Cool, we’re just warming up guys! Oh, forgot to mention, we will be using TypeScript 😎 Apollo supports type definitions for TypeScript out of the box!
TypeScript Setup
To enable TypeScript in our Node.js application, we need to do a couple of quick & simple steps (it’s well worth it!):
tsc --initThe tsc --init command creates a tsconfig.json file, with a default setup, which represents the TypeScript configuration of the application.
All good? Any sort of command not found: tsx? If so, just install TypeScript to your machine, and re-run the previous command:
npm install -g typescript
tsc --init
On the tsconfig.json file, copy & paste the configuration below:
{
  "compilerOptions": {
    "target": "es5" /* Specify ECMAScript target version: 'ES3' (default), 'ES5', 'ES2015', 'ES2016', 'ES2017', 'ES2018', 'ES2019', 'ES2020', or 'ESNEXT'. */,
    "module": "commonjs" /* Specify module code generation: 'none', 'commonjs', 'amd', 'system', 'umd', 'es2015', 'es2020', or 'ESNext'. */,
    "strict": true /* Enable all strict type-checking options. */,
    "noImplicitAny": false /* Raise error on expressions and declarations with an implied 'any' type. */,
    "esModuleInterop": true /* Enables emit interoperability between CommonJS and ES Modules via creation of namespace objects for all imports. Implies 'allowSyntheticDefaultImports'. */,
    /* Advanced Options */
    "skipLibCheck": true /* Skip type checking of declaration files. */,
    "forceConsistentCasingInFileNames": true /* Disallow inconsistently-cased references to the same file. */
  }
}
Alright, everyone. If it’s all working as we expect it to, shall we move on to the next chapter?
Apollo GraphQL
Before we dive into the Apollo Server, let’s just quickly talk about what is behind it. Same as the GraphQL client library we used in the previous post, Apollo Client, they are part of the Apollo platform.
The Apollo platform enables developers to work with data graphs, by providing libraries & tools to build, query, and manage the data layer. Among those libraries & tools, there is a pretty cool thing called Apollo Studio. No worries, we are gonna explore it together in the second part of this post!
The good thing about Apollo is, besides all the cool stuff mentioned above, that it is free to use! Well, if you require more advanced features such as team collaboration or single sign-on support, then you have to pay for it. Not the case for building our own applications tough!
For those of you using VS Code as the code editor, there is great extension available provided by Apollo GraphQL! It enables syntax highlighting, autocomplete, etc.. I enjoy the color theme as well 👍
Okey dokey, back to today’s goal, guys! Next, we will set up the Apollo library on our GraphQL server!
GraphQL Server Example
At this point, we’ve created the config files for our project (package.json and tsconfig.json) and installed the libraries we will need. Time to write some code, developers!
On a new file called index.ts, located on the root level of the application, let’s start by writing the following code:
const { ApolloServer, gql } = require("apollo-server");

// simple sample data
const messages = [
  {
    title: "Welcome, Developers",
    content: "Hello from our GraphQL API!",
  },
];

// define the schema type definition
const typeDefs = gql`
  # defines the data type to be consumed by the queries
  type Message {
    title: String
    content: String
  }

  # defines the Query special type object
  type Query {
    messages: [Message]
  }
`;

// create the resolvers
const resolvers = {
  Query: {
    messages: () => messages,
  },
};

// define the Apollo Server instance
const server = new ApolloServer({ typeDefs, resolvers });

// The `listen` method launches a web server.
server.listen().then(({ url }) => {
  console.log(`GraphQL server running at ${url}`);
});
Cool, we have just created our first GraphQL Server! Of course, in the simplest way. But it gives you a basic idea about it! Before I explain each component of the code, shall we run it to see the API in action?
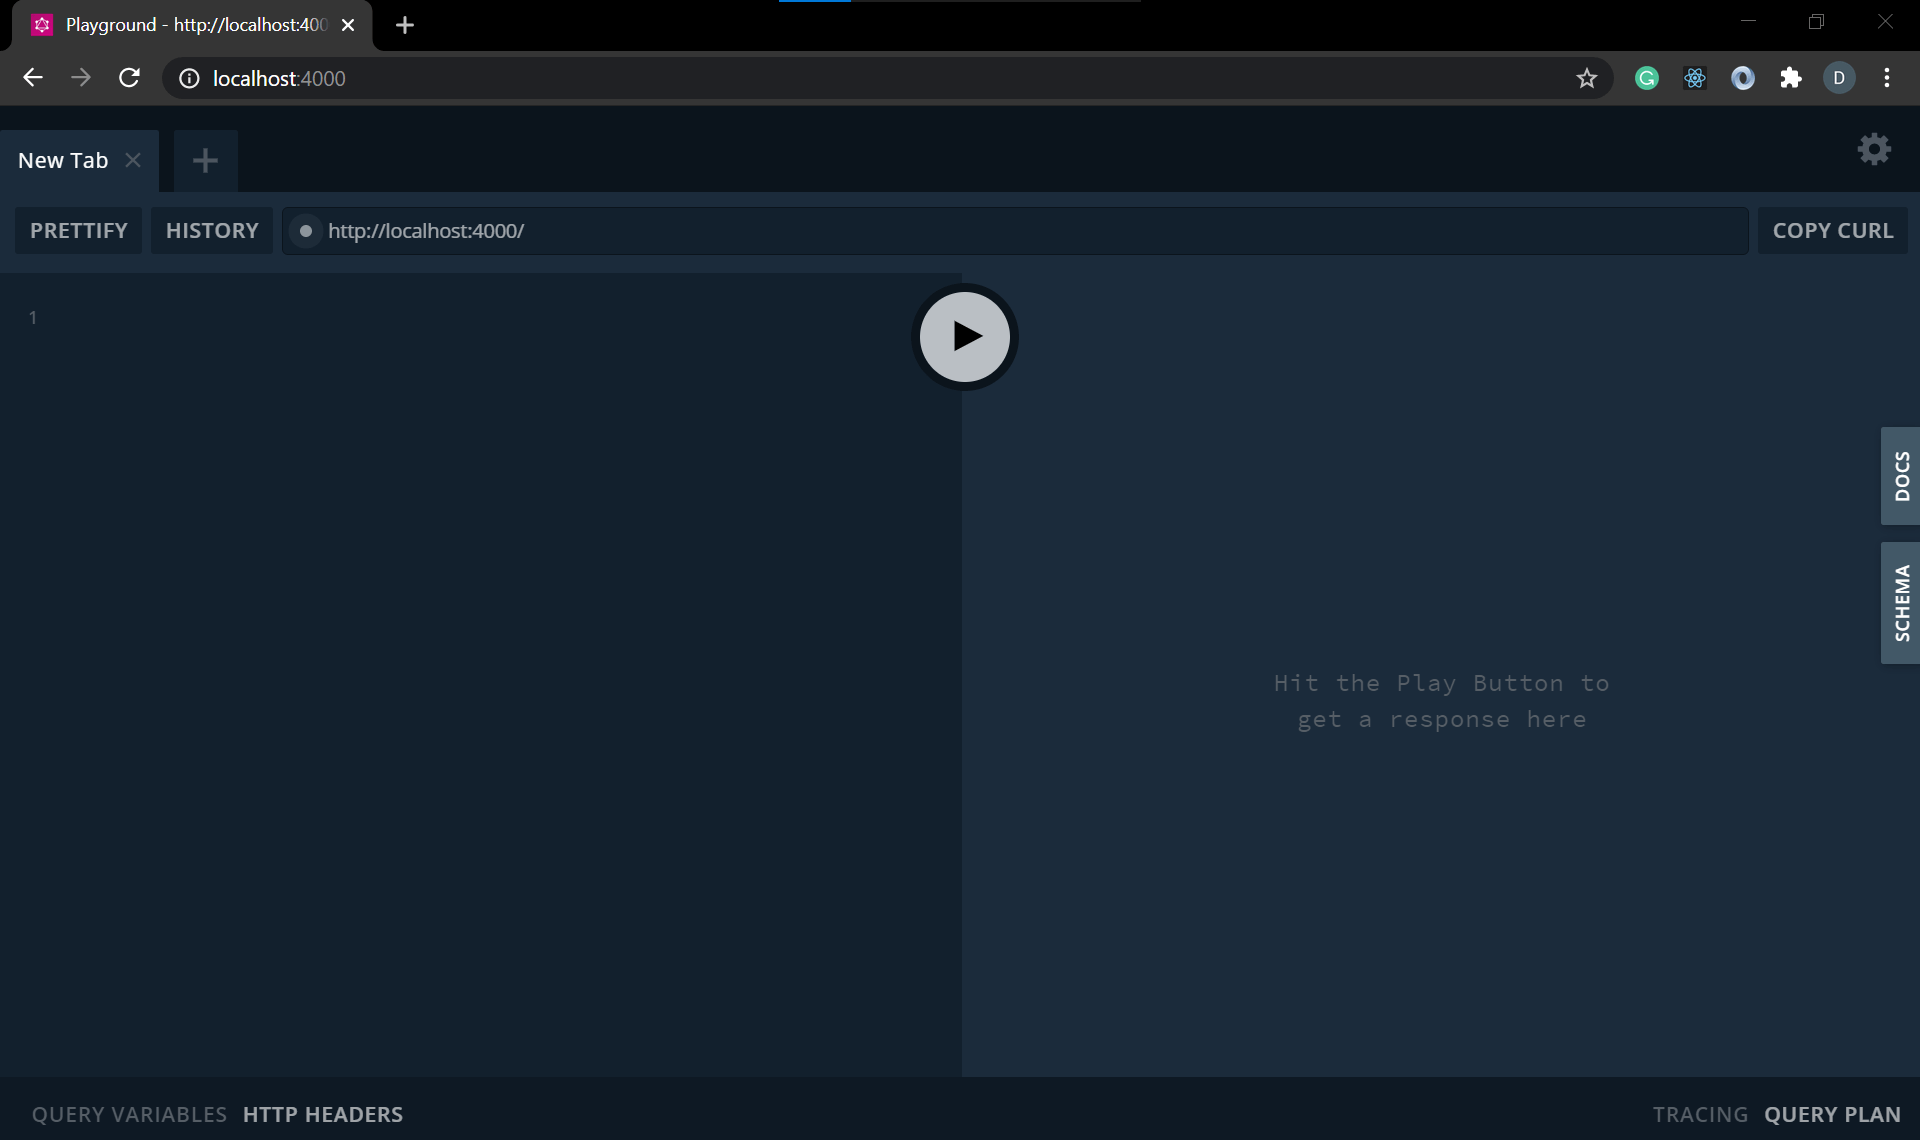
node index.tsThe message GraphQL server running at... should be printed to your code editor’s console. Then, open the URL on your browser. If all went as we expect, you should be visualizing now the GraphQL Playground:
GraphQL Playground is a great feature to query your data! It’s an in-browser GraphQL IDE, based on GraphiQL, that provides awesome functionalities such as query syntax validation and auto-complete.
Take the time to play with it, and run a query based on the schema defined previously:
{
  messages {
    title
    content
  }
}
Once clicked on the Play button, on Ctrl + Enter, the data should look like it:

Cool, what if I want to explore a GraphQL API but do not know anything about the queries available, or the data schema? Not a problem for the GraphQL Playground!
On the right-hand side, click on the Schema tab and explore it:
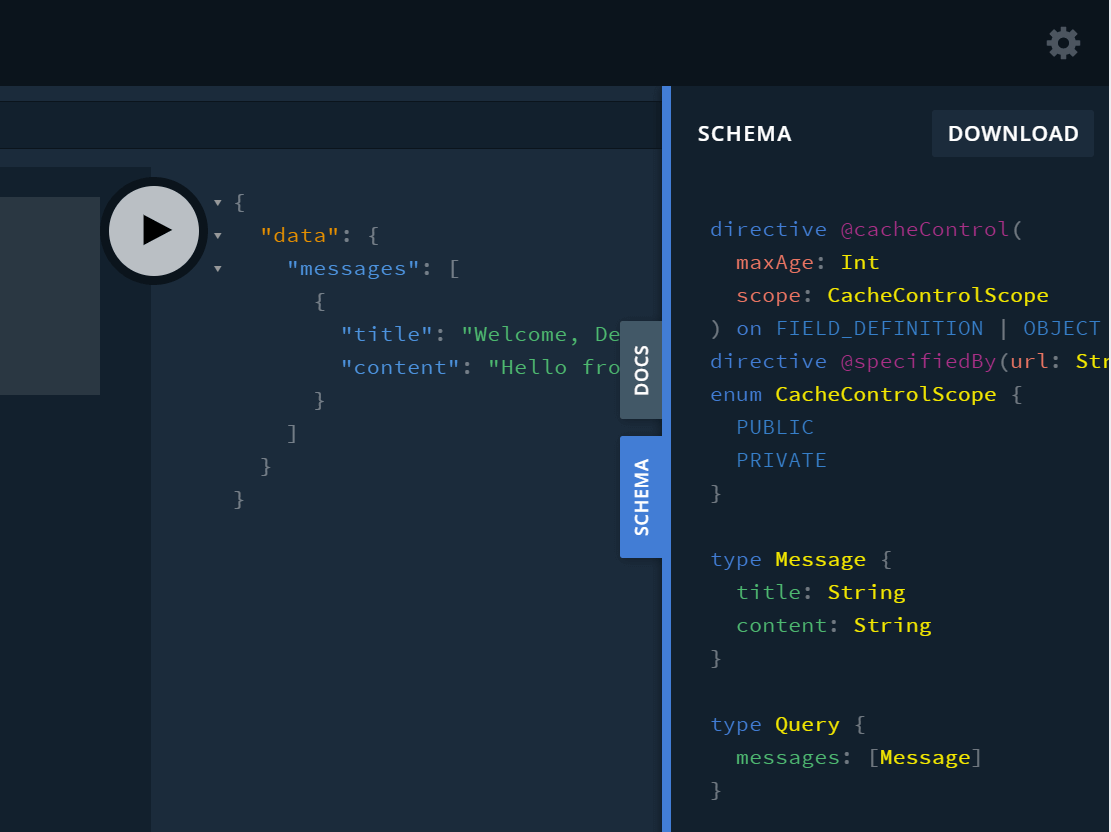
Pretty cool, isn’t it? The GraphQL Playground is customizable and only available on the development environment by default. I recommend you to have a look at the GitHub repo to learn more about it such as custom themes and enabling it on the production environment.
In the next chapter, we learn about the data that we’re going to use in this exercise!
Data Source
When planning the data source for our API to expose, the requirements I thought were:
- Real-world data
- A good amount of data to play with
- A fun and interesting subject!
To avoid a verbose and overwhelm post, we are not querying data directly from a database. I’ve decided to leave it for the second part of this two-part series. Instead, we are using a JSON file that contains the data. Thanks to Nasdaq Trader, we’ve got a dataset with all securities listed on Nasdaq! Awesome, right? 👌
Before we continue building our GraphQL server, let’s import the data file to the application. I’ve uploaded it to a shared folder. Please, use this link to download (approx. 440 KB) the data source, guys!
I hope you won’t find any issues downloading the file, guys. However, alternatively, you can also find the data on the application repository on GitHub.
Let’s create a new folder called data on the root level, and import the nasdaq.json file to it.
By exploring the data, it enables us to start identifying a data schema:
[
    {
        "symbol": "AACG",
        "securityName": "ATA Creativity Global - American Depositary Shares, each representing two common shares"
    },
    {
        "symbol": "AACQ",
        "securityName": "Artius Acquisition Inc. - Class A Common Stock"
    },
    {
        "symbol": "AACQU",
        "securityName": "Artius Acquisition Inc. - Unit consisting of one ordinary share and one third redeemable warrant"
    },
    {
        "symbol": "AACQW",
        "securityName": "Artius Acquisition Inc. - Warrant"
    },
    {...}
]
Excellent, let’s hold on and learn more about GraphQL schemas in the next chapter!
The GraphQL SDL
The GraphQL schema definition language (SDL) is used to define a schema and store it as a string. A schema has the purpose of defining the shape of our graph data. By shape, we can think of data types and the hierarchy of them.
Also, the schema defines the queries and mutations available to be consumed by clients. Do not worry about mutations at this moment, we dive deep into it in the next part of the post. But just be aware that it’s similar to a query but instead of reading data, it writes data back to the data source.
Before creating the schema for our API, we will restructure our application!
Application Architecture
In any JavaScript application (front or back-end), there are plenty of different approaches when it comes to choosing the best architecture. In my personal opinion, there is such thing as a right or wrong option. It mostly depends on the complexity of the application you are building.
At the end of the day, the last thing that we want is to overcomplicate things. Obviously, regardless of the choice, a few concepts must be kept in minds such as code maintainability and future enhancements to the application.
For the scenario of this exercise, I have decided to implement the following architecture:
data
  |__ nasdaq.json
src
  |__ index.ts
  |__ schema.graphql.ts
  |__ resolvers.ts
package.json
tsconfig.json
Shall we structure our application in this way, guys? Start by creating the folders and the files, then we code them together. Time your time, once you are done, let’s move on!
Data Schema
Time to define the schema of our GraphQL API, developer! On the src/schema.graphql file, write the code below:
const { gql } = require("apollo-server");

const schema = gql`
  type Security {
    symbol: String
    securityName: String
  }
  type Query {
    securities: [Security] # returns an array of securities
  }
`;

module.exports = schema;
We’ve just defined a type Security and a query securities.
Great, the schema’s been defined with success! Wait, what about the String data type used on it? Is there any other data type available? Fair question, let’s talk about GraphQL data types 👍
Data Types
There are a few categories of data types in GraphQL:
Scalar Types: ID (string), Int, Float, String, Boolean;Object Types: Types we define in the GraphQL schema (e.g., Security);Query Type: Defines the top-level entry points for the queries in the API. Each field on it has a name and a return type;Mutation Type: Similar to the Query type, but instead of a query, it defines the entry points for write operation;Input Types: This is a cool one. It is a structure that can be passed as an argument to queries and mutations;Enum Types: List of predefined options.
It might look overwhelming at first, but with practice, it’s gonna look more natural to us 💪
Perfect, we learned about schemas, type definitions, and data types. Got it. But I still have a question 🤔 How does Apollo Server know how to populate each query field, defined through the schema, with the source data?
Well, then it’s time to learn about resolvers!
Resolvers
Think of resolver as nothing more than a function responsible for populating data to each field defined in the schema. In our scenario, here is where we define how our API accesses and handles the queries to our nasdaq.json data source. In the world out there, it can be any data source, from a database to a REST API. We’ll explore more of it in the next part of this post series.
Let’s put some code in place to make it easier for us to understand. Remember the resolvers.ts file we created previously?
const securityData = require("../data/nasdaq.json");

const serverResolvers = {
  Query: {
    securities() {
      return securityData;
    },
  },
};

module.exports = serverResolvers;
Good enough for what we need today, guys! This is the simplest example, but you’ve got the idea, haven’t you? 😉
Apollo Server
We’re almost there, everyone! Stay focused! On the entry file, index.ts, we will now link all the components:
const { ApolloServer } = require("apollo-server");

// import resolvers
const resolvers = require("./resolvers.ts");

// import schema
const typeDefs = require("./schema.graphql.ts");

// instantiate the apollo server
const server = new ApolloServer({ typeDefs, resolvers });

// start the graphql server
server.listen().then(({ url }) => {
  console.log(`Server ready at ${url}`);
});
What message did you get on your console? Server ready at...? Then, it worked perfectly fine guys!
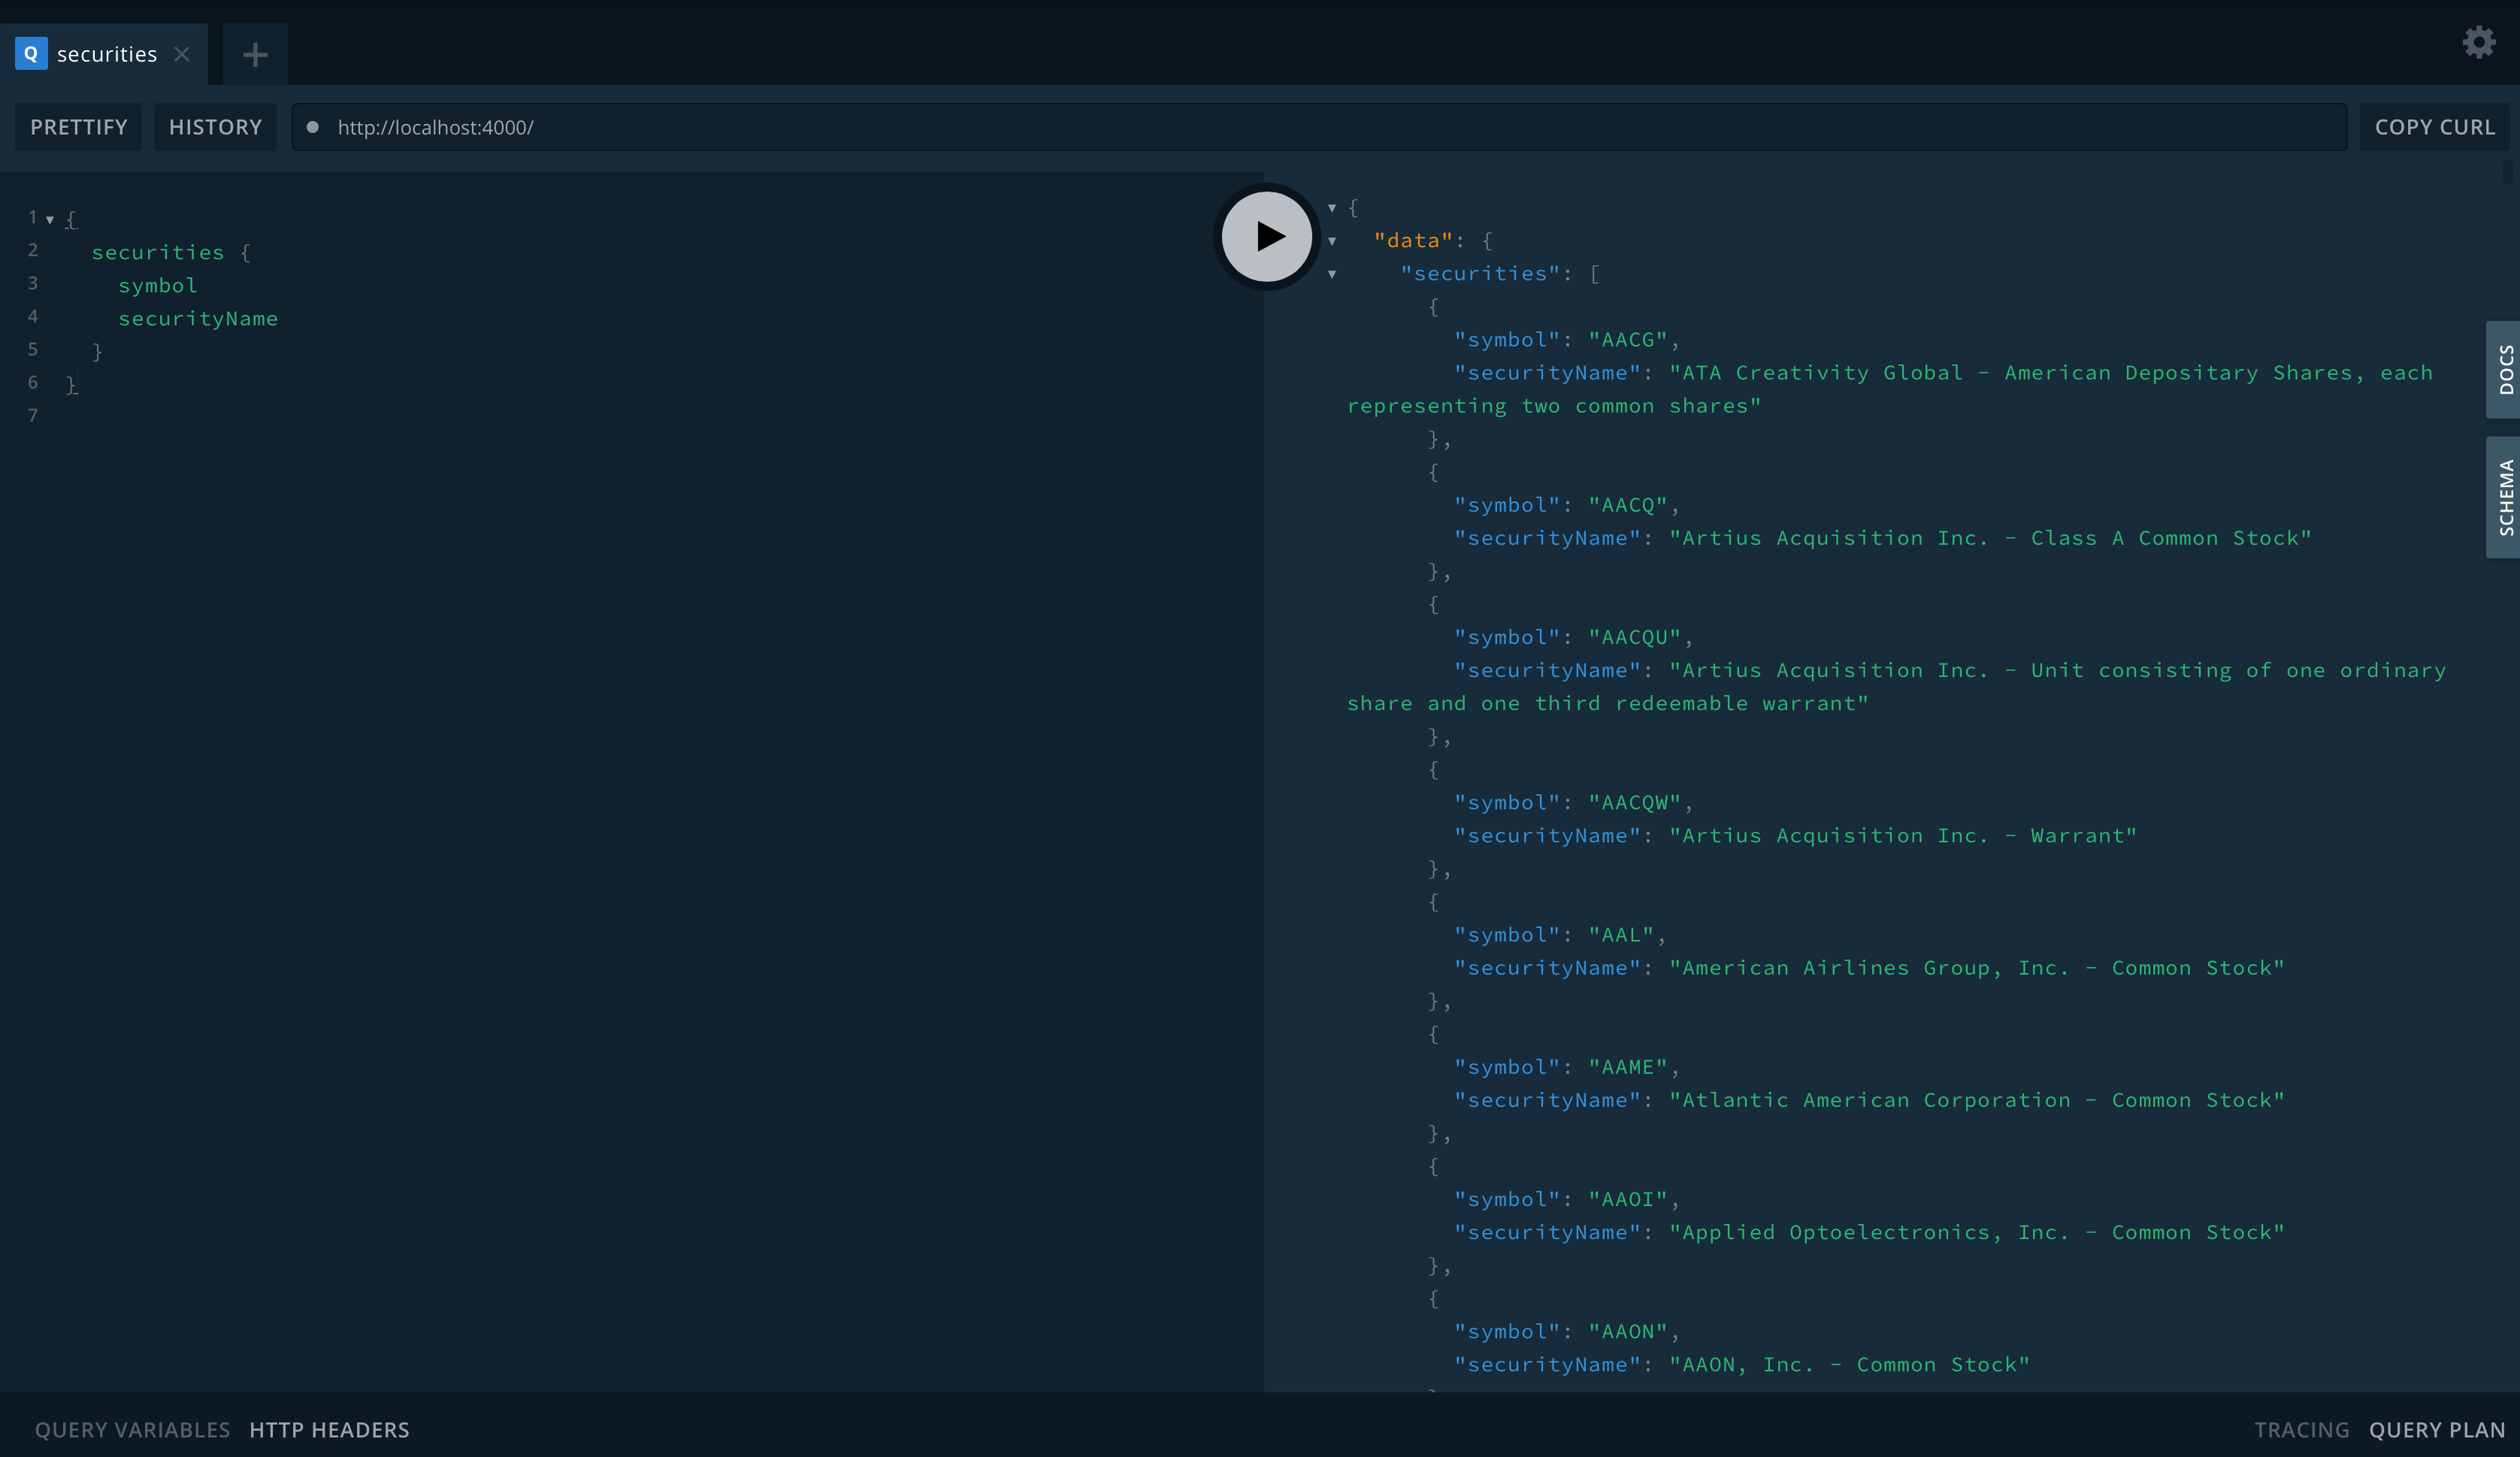
Testing API
Moment of truth! Shall we test our GraphQL API? Go to the browser and enter the URL printed on the console message above. Then, enter the following query on the left side of the GraphQL Playground:
{
  securities {
    symbol
    securityName
  }
}
Can you see the security data on the right side?
Well done, developer, well done! Congrats, mission accomplished ✅
That’s it for today, my friends! Hope you have had a good time ✌️ The GraphQL server we built together is available on the GitHub repo!
In The Next Part
Ladies and gentlemen, there is a lot of cool stuff coming in the second part! Just to give you some feeling of it, here’s what we will learn next:
- Query Arguments
- Prisma
- Mutations
- Subscriptions
- GraphQL Best Practices
- And much more!
I am working on it already! It should be released in the next couple of weeks! Study tuned, developers 🎉 Great times are coming!
Useful Resources
- Today’s Code on GitHub
- GraphQL
- TypeScript
- Apollo GraphQL
- Apollo Server
- Apollo Playground
- Nasdaq Trader
Update ⚡
Here is the second part of this post series, developers 💪
Conclusion
I wish you all have learned something, and most importantly, have had a good time building our exercise!
Well done for getting the job done, everyone 👏 Thank you very much for your time and attention.
I hope to see you here again in the second and final part of our post series about GraphQL servers!
Keep up with the hard work, guys! It always pays off! Take care, and see you soon!
I’d love to hear your feedback about this post. Your review below would be much appreciated to make our content better!
Follow Us
The Welcome, Developer has a brand new LinkedIn page! If you enjoy our content, we would be very happy to have you as a follower! In there, we will update you about new posts, new projects, and all the cool stuff!